Add an Ingress Controller to a ROSA Cluster and optionally with a custom domain.
This content is authored by Red Hat experts, but has not yet been tested on every supported configuration.
Starting with OpenShift 4.14, ROSA supports adding additional Ingress Controllers which can use used to configure a custom domain on a ROSA cluster without having to use the now deprecated Custom Domain Operator. This guide shows how to add an additional Ingress Controller ( public or private ) to a ROSA cluster and optionally also configuring a custom domain.
Prerequisites
- A Red Hat OpenShift on AWS (ROSA) cluster
- The oc CLI #logged in.
- The aws CLI #logged in.
- The rosa CLI #logged in.
- (optional) A Public Route53 Hosted Zone, and the related Domain to use.
Set up environment
- Export few environment variables
Important: The variables below can be customized to fit your needs for your ingress controller.
CERT_NAME - this is the name of the tls secret for the domain of your ingress controller. This tls secret must be stored in the
openshift-ingressnamespace. If you are adding an additional Ingress Controller to the openshiftapps.com domain that comes with ROSA, use the name of the secret in the openshift-ingress namespace that has the naming format of(ID)-primary-cert-bundle-secret.
SCOPE - this will be the scope of the Network Load Balancer that will be provisioned. The scope can be either Internal for a private network load balancer or External for an Internet facing network load balancer.
export INGRESS_NAME=public-ingress #name of the new ingress controller
export CERT_NAME="lab-domain-com-tls-cert"
export SCOPE="External"
export AWS_PAGER=""
export HOSTED_ZONE_ID=ABCDEFGHEXAMPLE
export HOSTED_ZONE_REGION=us-east-2
export DOMAIN=lab.domain.com   #Custom Hosted Zone Domain for apps
export SCRATCH_DIR=/tmp/scratch
mkdir -p $SCRATCH_DIR
Create the Ingress Controller.
envsubst  <<EOF | oc apply -f -
apiVersion: operator.openshift.io/v1
kind: IngressController
metadata:
  annotations:
    ingress.operator.openshift.io/auto-delete-load-balancer: "true"
  finalizers:
  - ingresscontroller.operator.openshift.io/finalizer-ingresscontroller
  generation: 2
  labels:
    hypershift.openshift.io/managed: "true"
  name: $INGRESS_NAME
  namespace: openshift-ingress-operator
spec:
  clientTLS:
    clientCA:
      name: ""
    clientCertificatePolicy: ""
  defaultCertificate:
    name: $CERT_NAME
  domain: $DOMAIN
  endpointPublishingStrategy:
    loadBalancer:
      dnsManagementPolicy: Unmanaged
      providerParameters:
        aws:
          networkLoadBalancer: {}
          type: NLB
        type: AWS
      scope: $SCOPE
    type: LoadBalancerService
  httpCompression: {}
  httpEmptyRequestsPolicy: Respond
  httpErrorCodePages:
    name: ""
  replicas: 2
  tuningOptions:
    reloadInterval: 0s
  unsupportedConfigOverrides: null
EOF
Describe the Ingress Controller to confirm it’s ready.
oc describe IngressController $INGRESS_NAME -n openshift-ingress-operator
You should see an output that mentions that the ingress controller is Admitted.
Normal Admitted 2m16s ingress_controller ingresscontroller passed validation
Also verify the router pods of the new ingress controller are running
oc get pods -n openshift-ingress | grep $INGRESS_NAME
Expected output is two pods in a Running state.
router-public-7dd48fdcbb-bpdzc    1/1     Running   0          4m20s
router-public-7dd48fdcbb-cn7hb    1/1     Running   0          4m20s
Create a Route 53 entry for the new domain / network load balancer
Get the NLB environment variables:
NLB_HOSTNAME=$(oc get service router-public -o jsonpath='{.status.loadBalancer.ingress[0].hostname}')
NLB_NAME=$(echo $NLB_HOSTNAME | sed 's/-.*//')
NLB_REGION=$(echo $NLB_HOSTNAME | cut -d "." -f 3)
NLB_HOSTED_ZONE=$(aws elbv2 describe-load-balancers --name $NLB_NAME --region $NLB_REGION | jq -r ".LoadBalancers[0].CanonicalHostedZoneId")
Create an alias record json statement.
cat <<EOF > $SCRATCH_DIR/add_alias_record.json
{
    "Comment":"Adding an alias record for the NLB in Route 53",
    "Changes":[{
     "Action": "CREATE",
     "ResourceRecordSet":{
 	      "Name": "*.$DOMAIN",
 		    "Type":"A",
       "AliasTarget": {
         "HostedZoneId": "$NLB_HOSTED_ZONE",
         "DNSName": "$NLB_HOSTNAME",
        "EvaluateTargetHealth": false
 		    }
     }
  }
 ]
}
EOF
Create a new route 53 record to point to the domain / network load balancer
aws route53 change-resource-record-sets --hosted-zone-id $HOSTED_ZONE_ID --change-batch file://$SCRATCH_DIR/add_cname_record.json
Test an application.
Create a test applciation in a new namespace.
oc new-project testapp
oc new-app --docker-image=docker.io/openshift/hello-openshift -n testapp
Expose the test application Service.
Let’s create a Route to expose the application from outside the cluster, and annotate the Route to give it a new Certificate.
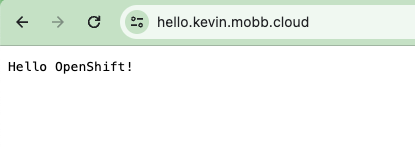
oc create route edge --service=hello-openshift testroute --hostname hello.$DOMAIN -n testappAccess the application Route.
Open your browser to hello.$DOMAIN and you will see a secured web page that displays Hello OpenShift.