Configure Red Hat SSO with Azure AD as a Federated Identity Provider
This content is authored by Red Hat experts, but has not yet been tested on every supported configuration.
This guide demonstrates how to install and configure Red Hat SSO (Keycloak) into an Azure Red Hat OpenShift (ARO) cluster. It will also also configure the ARO cluster to use the SSO server as a mechanism to login by way of the OIDC protocol. In addition, Red Hat SSO can federate user identities with other identity providers. We will use Azure AD as an additional identity provider to show how this could be done.
This guide will walk through the following steps:
- Install Red Hat SSO into an ARO cluster
- Configure Azure AD
- Configure Azure AD as an identity provider in Red Hat SSO
- Integrate ARO with Red Hat SSO for authentication
Before you Begin
- Please review the Official Red Hat SSO Operator Documentation on this topic.
- Please ensure you have stood up an ARO cluster. See the Quick Start for to get started if needed.
NOTE: there is also a Keycloak operator which is community supported. This is not covered as part of this documentation, however if desired, you may use the Keycloak operator instead. Please understand that the Keycloak operator does not have the same functionality and offers different API schemas and a different set of custom resources. For more information on the Keycloak operator, please visit https://www.keycloak.org/operator/installation .
Set the Environment
Set the environment variables needed in the following steps:
SSO_NAMESPACE=keycloak
AZ_REGION=eastus
AZ_RESOURCE_GROUP=dscott-sso-rg
AZ_VNET=dscott-sso-aro-vnet-eastus
AZ_PRIVATE_ENDPOINT_SUBNET=dscott-sso-aro-machine-subnet-eastus
AZ_CLUSTER_NAME=dscott-sso
AZ_CONSOLE=$(az aro show -n $AZ_CLUSTER_NAME -g $AZ_RESOURCE_GROUP --query consoleProfile.url -o tsv)
PG_USER=dscott
PG_PASS='P@ssword1234'
Deploy the Operator
Create a project where your operator will be installed to:
oc new-project $SSO_NAMESPACE
To install, first create an Operator Group for the operator:
cat <<EOF | oc apply -f -
apiVersion: operators.coreos.com/v1
kind: OperatorGroup
metadata:
  name: keycloak-operator
  namespace: $SSO_NAMESPACE
spec:
  targetNamespaces:
    - $SSO_NAMESPACE
EOF
Next, install the subscription:
cat <<EOF | oc apply -f -
apiVersion: operators.coreos.com/v1alpha1
kind: Subscription
metadata:
  name: rhsso-operator
  namespace: $SSO_NAMESPACE
spec:
  channel: stable
  installPlanApproval: Automatic
  name: rhsso-operator
  source: redhat-operators
  sourceNamespace: openshift-marketplace
  startingCSV: rhsso-operator.7.6.3-opr-002
EOF
Deploy the Database (Optional)
It may be desirable to keep the database management to include backups and persistence outside of the OpenShift cluster. If this is a desired configuration, then you can create an Azure Postgres DB instance to store your Red Hat SSO data.
For reference, please see https://learn.microsoft.com/en-us/azure/postgresql/single-server/how-to-configure-privatelink-cli .
First, create the database:
NOTE Below is only a sample, be sure to replace arguments with your desired options.
az postgres server create \
  -l $AZ_REGION \
  -g $AZ_RESOURCE_GROUP \
  -n $AZ_CLUSTER_NAME \
  -u $PG_USER \
  -p "$PG_PASS" \
  --sku-name GP_Gen5_2 \
  --ssl-enforcement Disabled \
  --public-network-access Disabled \
  --backup-retention 10  \
  --geo-redundant-backup Disabled \
  --storage-size 10240 \
  --version 11
Create a private endpoint to restrict network access to private connectivity only:
az network private-endpoint create \
  --name $AZ_CLUSTER_NAME-pgsql \
  --resource-group $AZ_RESOURCE_GROUP \
  --vnet-name $AZ_VNET \
  --subnet $AZ_PRIVATE_ENDPOINT_SUBNET \
  --private-connection-resource-id $(az resource show -g $AZ_RESOURCE_GROUP -n $AZ_CLUSTER_NAME --resource-type "Microsoft.DBforPostgreSQL/servers" --query "id" -o tsv) \
  --group-id postgresqlServer \
  --connection-name $AZ_CLUSTER_NAME
Configure the private DNS zone for the private link connection:
az network private-dns zone create \
  --resource-group $AZ_RESOURCE_GROUP \
  --name "privatelink.postgres.database.azure.com"

az network private-dns link vnet create \
  --resource-group $AZ_RESOURCE_GROUP \
  --zone-name "privatelink.postgres.database.azure.com" \
  --name $AZ_CLUSTER_NAME-pgsql \
  --virtual-network $AZ_VNET \
  --registration-enabled false
Retrieve the private IP from the private link connection:
PRIVATE_IP=`az resource show \
  --ids $(az network private-endpoint show --name $AZ_CLUSTER_NAME-pgsql --resource-group $AZ_RESOURCE_GROUP --query 'networkInterfaces[0].id' -o tsv) \
  --api-version 2019-04-01 \
  -o json | jq -r '.properties.ipConfigurations[0].properties.privateIPAddress'`
Create the DNS records for the private link connection:
az network private-dns record-set a create \
  --name $AZ_CLUSTER_NAME-pgsql \
  --zone-name privatelink.postgres.database.azure.com \
  --resource-group $AZ_RESOURCE_GROUP

az network private-dns record-set a add-record \
  --record-set-name $AZ_CLUSTER_NAME-pgsql \
  --zone-name privatelink.postgres.database.azure.com \
  --resource-group $AZ_RESOURCE_GROUP \
  -a $PRIVATE_IP
Deploy the Server
With External Database
If you deployed an external database , then you can create the server and use the existing database. Otherwise proceed to creating the server with an internal database .
- Create the secret with the credential information:
cat <<EOF | oc apply -f -
apiVersion: v1
kind: Secret
metadata:
  name: keycloak-db-secret
  namespace: $SSO_NAMESPACE
stringData:
  POSTGRES_DATABASE: "postgres"
  POSTGRES_EXTERNAL_ADDRESS: "$AZ_CLUSTER_NAME-pgsql.privatelink.postgres.database.azure.com"
  POSTGRES_EXTERNAL_PORT: "5432"
  POSTGRES_HOST: "keycloak-postgresql"
  POSTGRES_PASSWORD: "$PG_PASS"
  POSTGRES_SUPERUSER: "true"
  POSTGRES_USERNAME: "$PG_USER@$AZ_CLUSTER_NAME"
type: Opaque
EOF
- Deploy the server:
cat <<EOF | oc apply -f -
apiVersion: keycloak.org/v1alpha1
kind: Keycloak
metadata:
  name: keycloak
  namespace: $SSO_NAMESPACE
  labels:
    app: sso
spec:
  instances: 2
  externalAccess:
    enabled: True
  externalDatabase:
    enabled: true
EOF
With Internal Database
Be sure to skip this step if you deployed an external database .
If you are deploying the server using an internal database, you can simply deploy the resource as follows which will create the server as well as an instance of PostgreSQL within your cluster as the backend database for the server:
cat <<EOF | oc apply -f -
apiVersion: keycloak.org/v1alpha1
kind: Keycloak
metadata:
  name: keycloak
  namespace: $SSO_NAMESPACE
  labels:
    app: sso
spec:
  instances: 2
  externalAccess:
    enabled: True
EOF
Retrieve Information About Red Hat SSO Installation
IMPORTANT: this sets environment variables based on the installation that are needed in future steps.
ADMIN_USERNAME=$(oc -n $SSO_NAMESPACE exec -it keycloak-0 -- printenv SSO_ADMIN_USERNAME)
ADMIN_PASSWORD=$(oc -n $SSO_NAMESPACE exec -it keycloak-0 -- printenv SSO_ADMIN_PASSWORD)
ADMIN_CONSOLE=$(oc -n $SSO_NAMESPACE get route keycloak -o json | jq -r '.status.ingress[0].host')
CALLBACK_URL_BASE=https://oauth-openshift.apps.$(az aro show -g $AZ_RESOURCE_GROUP -n $AZ_CLUSTER_NAME --query clusterProfile.domain -o tsv).$AZ_REGION.aroapp.io/oauth2callback
Configure Red Hat SSO
Configure Red Hat SSO as an OIDC Identity Provider for ARO (UI Method)
This method walks you through configuring Red Hat SSO as an OIDC provider by using the user interface. If you would like to control your configuration via Kubernetes custom resources, please review the CRD Method instead.
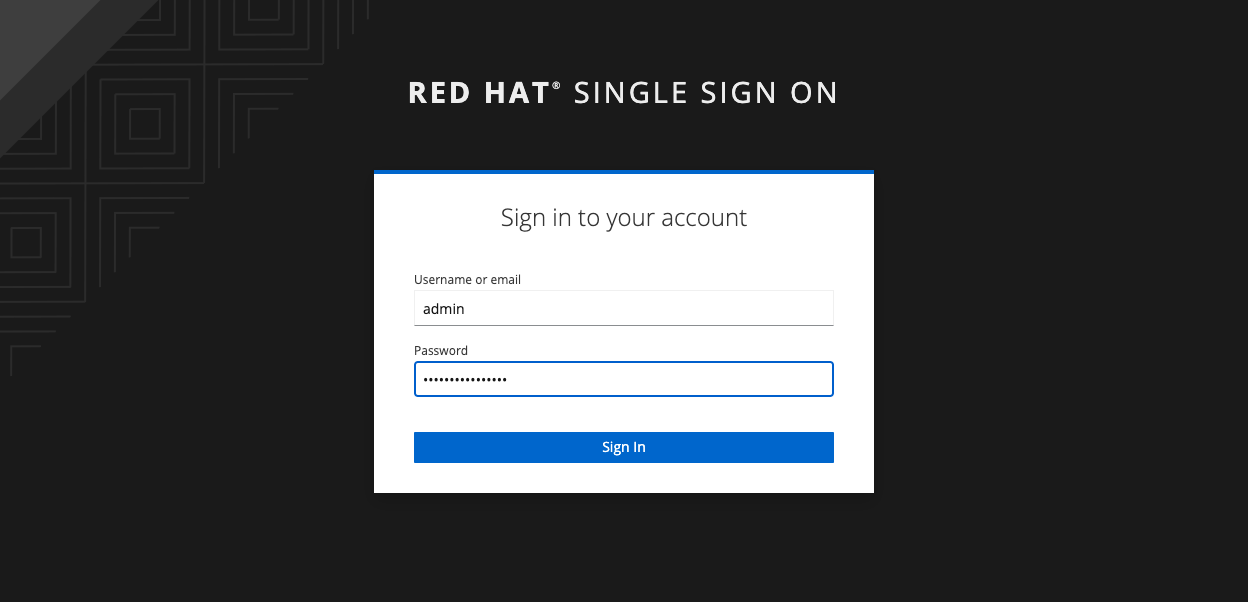
- Login to the host from the
ADMIN_CONSOLEenvironment variable set in the previous step using theADMIN_USERNAMEandADMIN_PASSWORD:
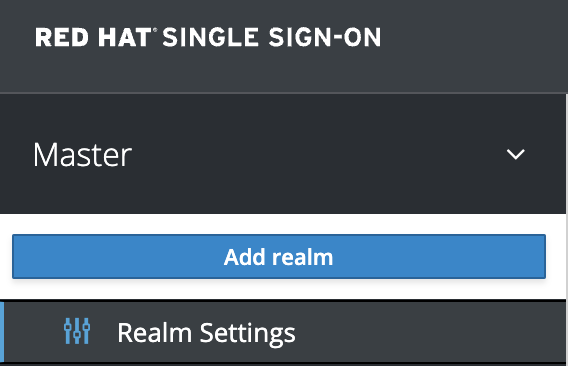
- Add a new realm by navigating to the top left corner, hovering over the
Masterrealm (default) and clickingAdd realm:
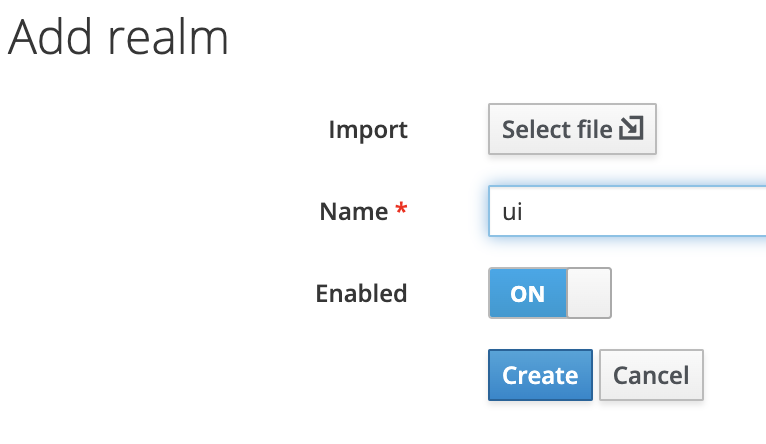
- Enter your desired realm name and make note of it, as it will be used in the URLs for this realm. Be sure
that enabled is set to
ONand then clickCreate:
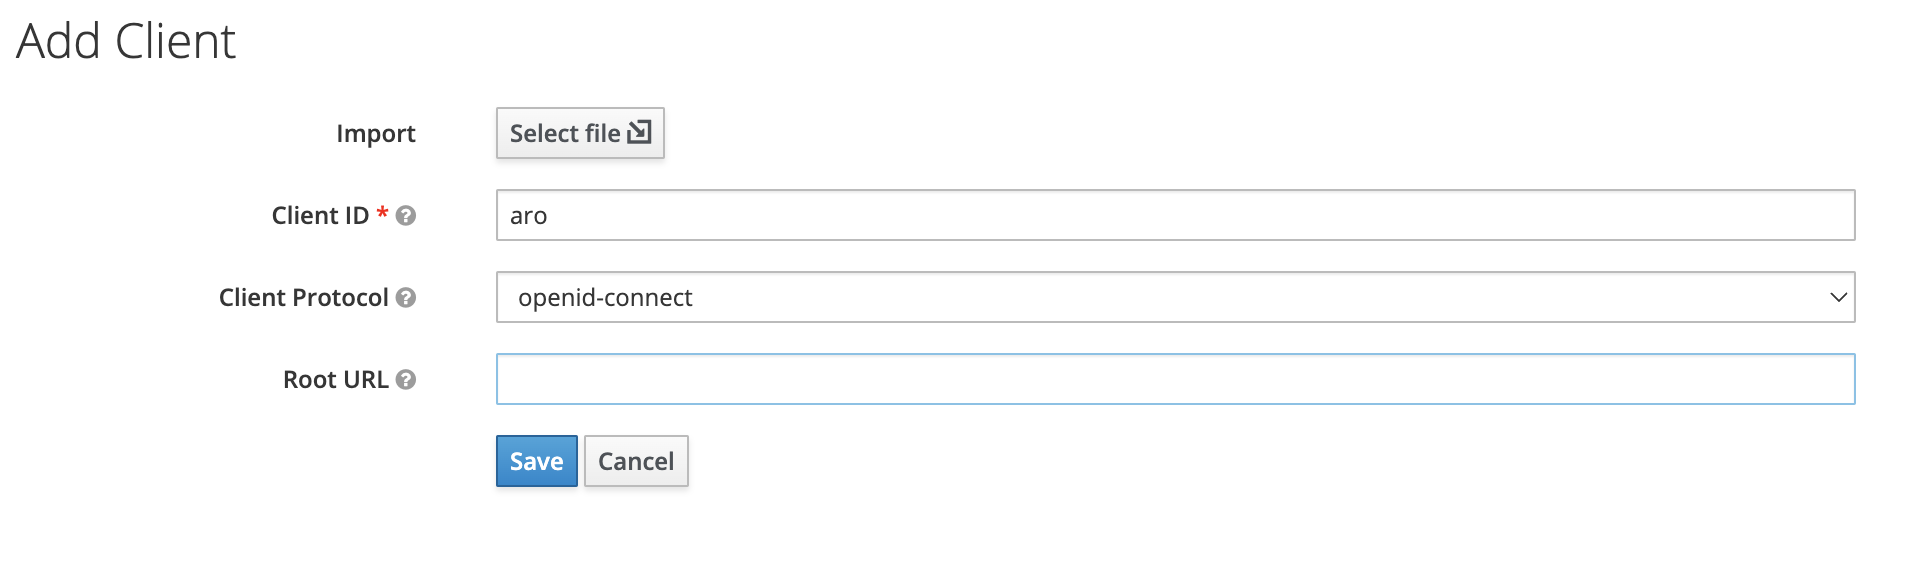
- Create a new client for OIDC authentication by navigating to
Clients > Createand input yourClient ID. Also make sure that the Client Protocol is set toopenid-connect. Make note of the client ID as it will be used when configuring ARO to authenticate against the Red Hat SSO server. Once done, clickSave:
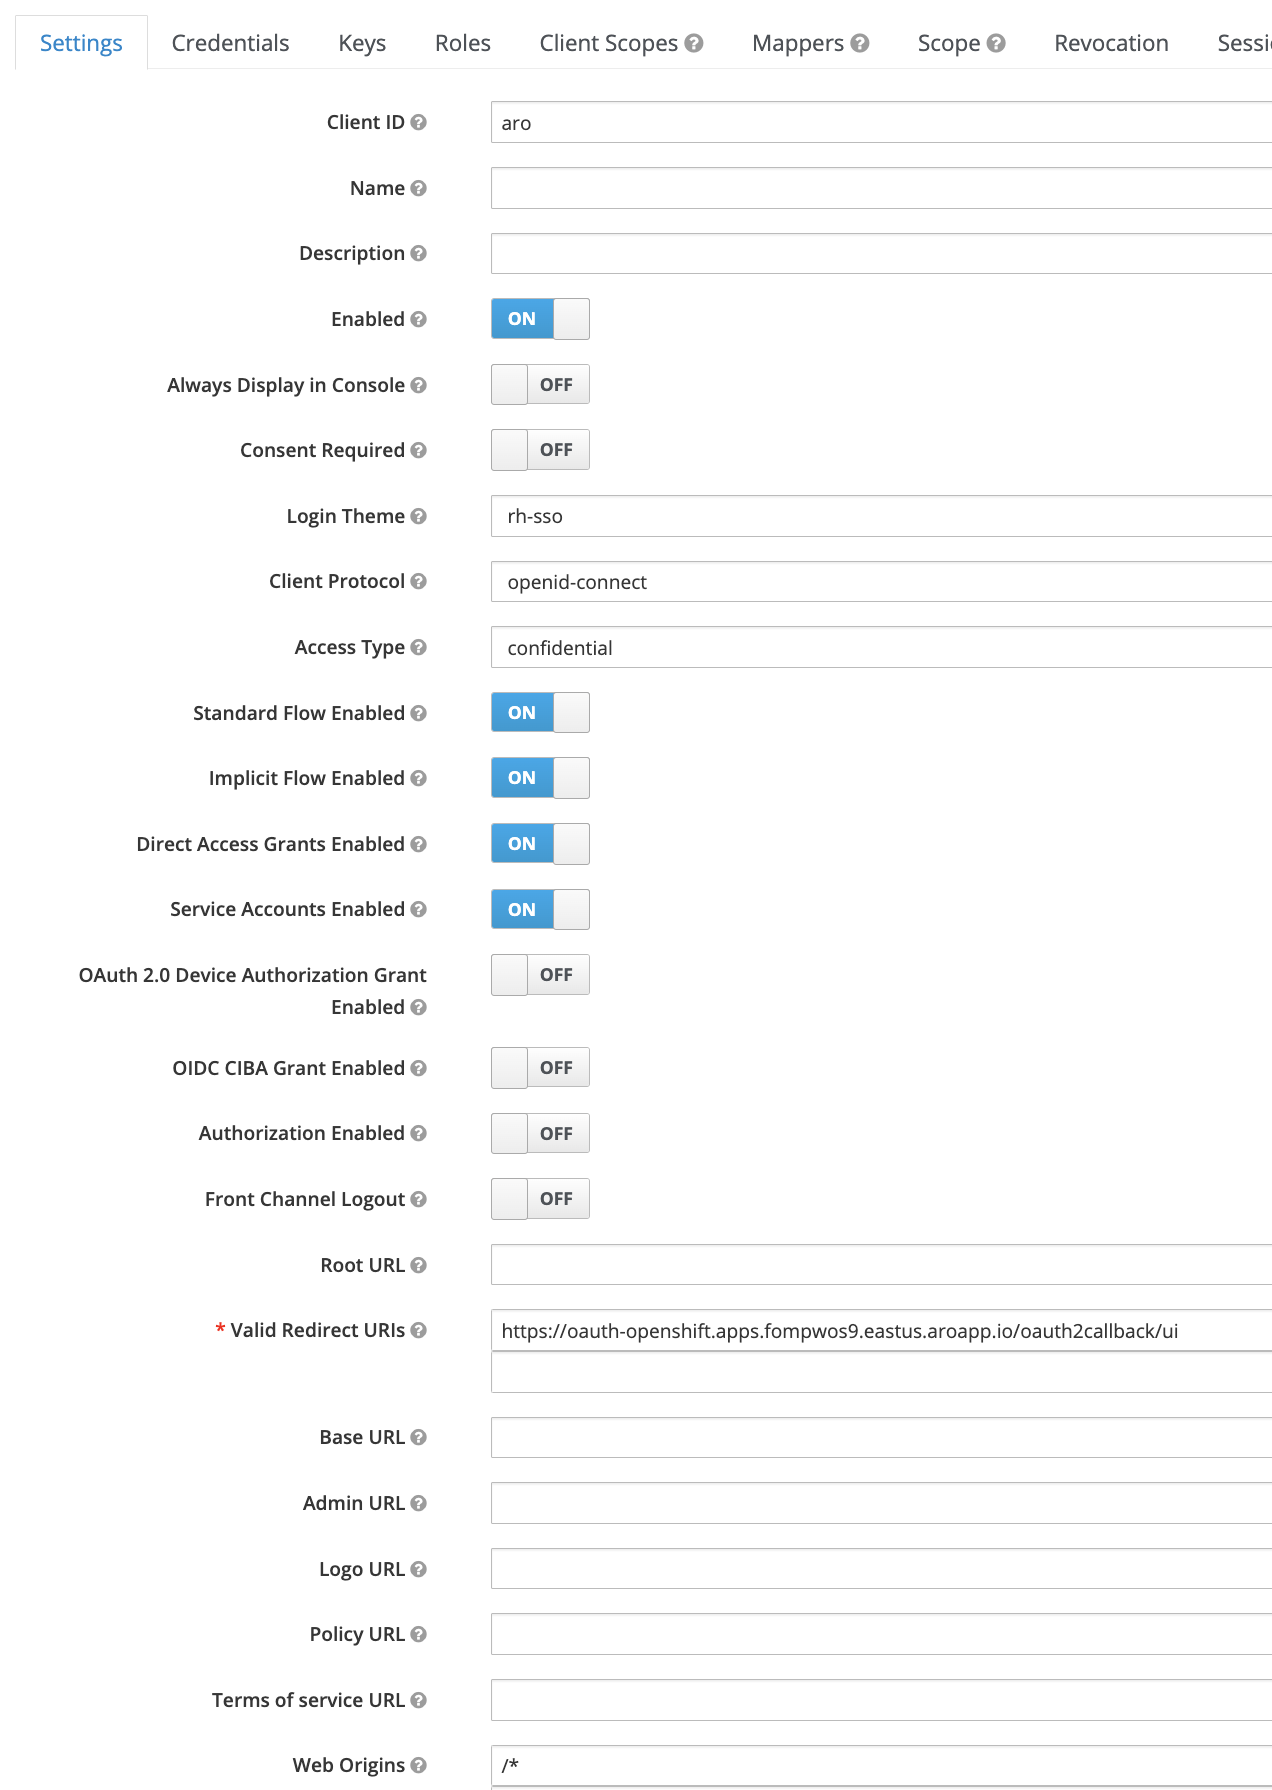
- Configure the new client by setting the following values in the
Settingstab. Be sure toSavebefore heading to the next step as these settings will create extra tabs in the UI for configuration:
- Login Theme:
rh-sso - Access Type:
confidential - Implicit Flow Enabled:
ON - Service Accounts Enabled:
ON - Valid Redirect URIs:
<Value of $CALLBACK_URL_BASE from above>/ui. Note that the/uiis a custom unique suffix that is tied to the identity provider resource - Web Origins:
/*
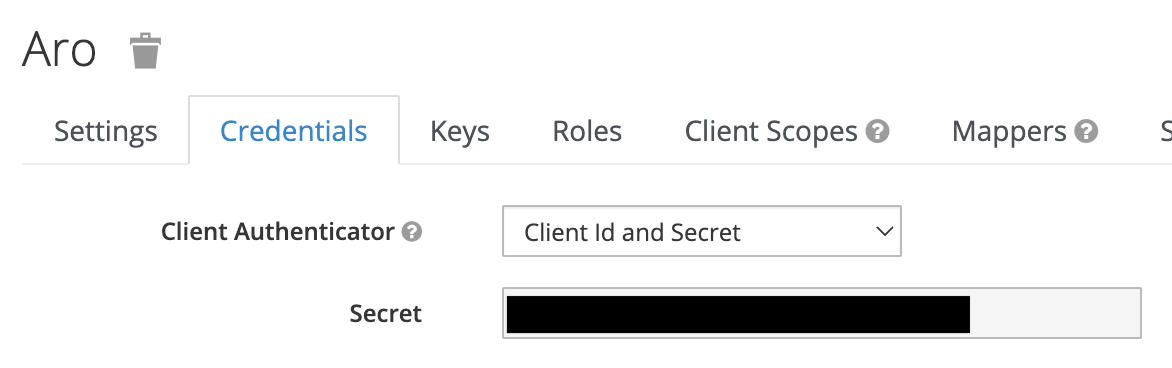
- Ensure the
Credentialstab has the following settings. Be sure to capture theSecretvalue for use in the next step:
- Client Authenticator:
Client Id and Secret - Secret:
<This secret is used to configure the IDP in OpenShift>. Note that the image below is redacted.
- Create the client secret. This is needed for the
OAuthOpenShift resource to correctly create the Red Hat SSO IDP as an OIDC provider:
oc -n openshift-config create secret generic red-hat-sso-ui --from-literal=clientSecret=<CLIENT_SECRET_FROM_LAST_STEP>
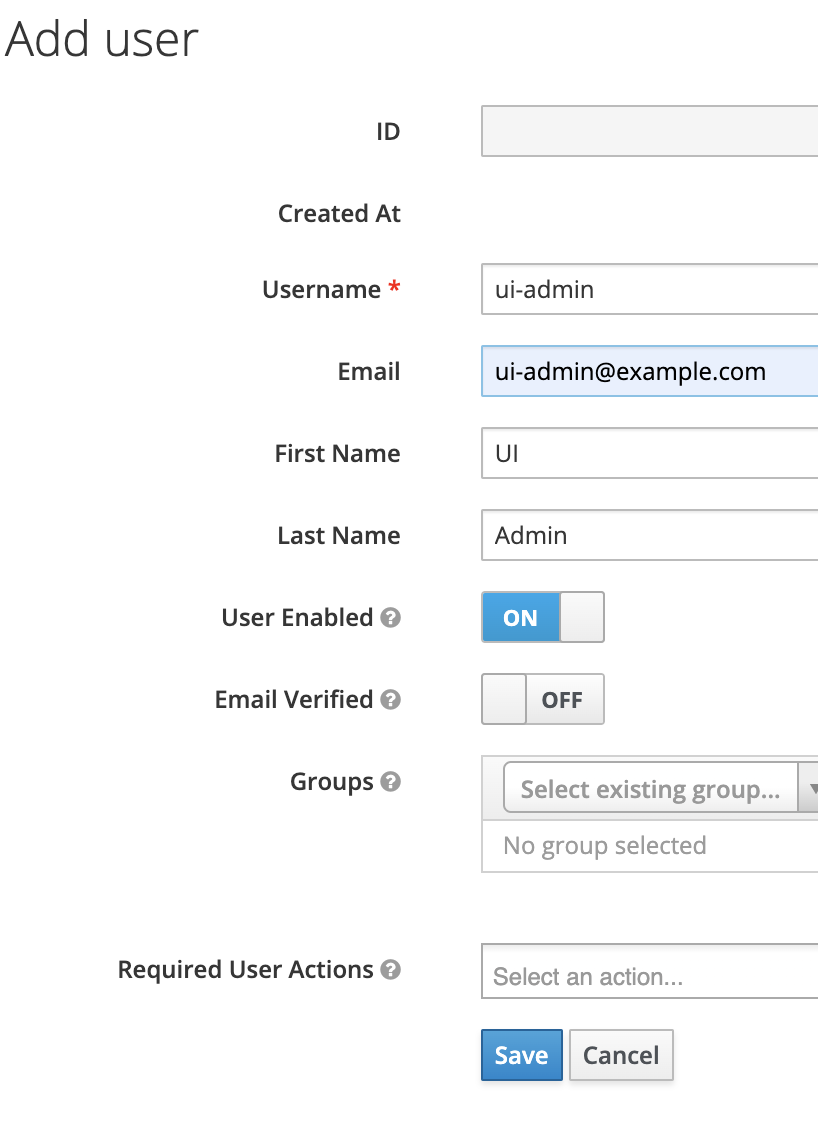
- Create a user for authentication by navigating to
Users > Add User, fill in the information and clickSave. Ensure this user isEnabled:
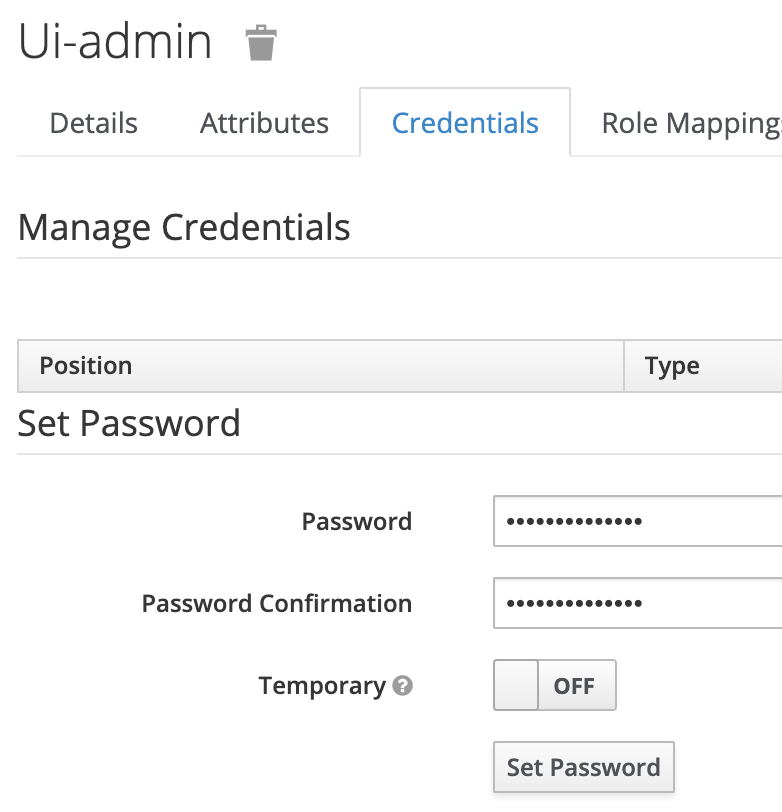
- Set a password for the user in the
Credentialstab for the user you created. Be sureTemporaryis set toOFFand then clickSet Password:
Configure Red Hat SSO as an OIDC Identity Provider for ARO (CRD Method)
This method walks you through configuring Red Hat SSO as an OIDC provider by using native Kubernetes CRDs. If you would like to control your configuration via the user interface instead, please review the UI Method .
- Create the realm:
cat <<EOF | oc apply -f -
apiVersion: keycloak.org/v1alpha1
kind: KeycloakRealm
metadata:
  name: crd
  namespace: $SSO_NAMESPACE
  labels:
    app: sso
spec:
  instanceSelector:
    matchLabels:
      app: sso
  realm:
    realm: crd
    enabled: true
# NOTE: you can set unmanaged to 'true' if you intend to manage this realm via the UI
# unmanaged: true
EOF
- Create the client:
cat <<EOF | oc apply -f -
apiVersion: keycloak.org/v1alpha1
kind: KeycloakClient
metadata:
  name: crd
  namespace: $SSO_NAMESPACE
  labels:
    app: sso
spec:
  realmSelector:
    matchLabels:
      app: sso
  client:
    clientId: aro
    name: aro
    description: "Azure Red Hat OpenShift"
    protocol: openid-connect
    enabled: true
    publicClient: false
    directAccessGrantsEnabled: true
    implicitFlowEnabled: true
    standardFlowEnabled: true
    serviceAccountsEnabled: true
    redirectUris:
      - $CALLBACK_URL_BASE/crd
    webOrigins:
      - "/*"
    defaultClientScopes:
      - acr
      - email
      - profile
      - roles
      - web-origins
    optionalClientScopes:
      - address
      - microprofile-jwt
      - offline_access
      - phone
  serviceAccountRealmRoles:
    - default-roles-crd
EOF
- Create the client secret. This is needed for the
OAuthOpenShift resource to correctly create the Red Hat SSO IDP as an OIDC provider:
oc -n openshift-config create secret generic red-hat-sso-crd --from-literal=clientSecret=$(oc get secret keycloak-client-secret-crd -o json | jq -r '.data.CLIENT_SECRET' | base64 -d)
- Create a user for authentication:
cat <<EOF | oc apply -f -
apiVersion: keycloak.org/v1alpha1
kind: KeycloakUser
metadata:
  name: crd
  namespace: $SSO_NAMESPACE
  labels:
    app: sso
spec:
  realmSelector:
    matchLabels:
      app: sso
  user:
    enabled: true
    username: crd-admin
    firstName: CRD
    lastName: Admin
    email: crd-admin@example.com
    credentials:
      - temporary: false
        type: password
        value: 'P@ssword1234'
EOF
Configure OpenShift
Configure OAuth Resource
If you used the
UI Method
then you can update your
OAuth resource as follows. Take note that if you have other identity providers configured here, you will want to
ensure that you only add a new identity provider to the YAML rather than replace it.
cat <<EOF | oc apply -f -
apiVersion: config.openshift.io/v1
kind: OAuth
metadata:
  name: cluster
spec:
  identityProviders:
    # NOTE: name needs to be lowercase as per https://access.redhat.com/solutions/6213561
    # NOTE: this maps to the /ui suffix when creating the client
    - name: ui
      mappingMethod: claim
      type: OpenID
      openID:
        clientID: aro
        clientSecret:
          name: red-hat-sso-ui
        extraScopes:
          - email
          - profile
        extraAuthorizeParameters:
          include_granted_scopes: "true"
        claims:
          preferredUsername:
            - preferred_username
          name:
            - name
          email:
            - email
        issuer: https://$ADMIN_CONSOLE/auth/realms/ui
EOF
If you used the
CRD Method
then you can update your
OAuth resource as follows. Take note that if you have other identity providers configured here, you will want to
ensure that you only add a new identity provider to the YAML rather than replace it.
cat <<EOF | oc apply -f -
apiVersion: config.openshift.io/v1
kind: OAuth
metadata:
  name: cluster
spec:
  identityProviders:
    # NOTE: name needs to be lowercase as per https://access.redhat.com/solutions/6213561
    # NOTE: this maps to the /ui suffix when creating the client
    - name: crd
      mappingMethod: claim
      type: OpenID
      openID:
        clientID: aro
        clientSecret:
          name: red-hat-sso-crd
        extraScopes:
          - email
          - profile
        extraAuthorizeParameters:
          include_granted_scopes: "true"
        claims:
          preferredUsername:
            - preferred_username
          name:
            - name
          email:
            - email
        issuer: https://$ADMIN_CONSOLE/auth/realms/crd
EOF
Test Login to OpenShift
IMPORTANT It takes a few minutes for the above configuration to be applied to the cluster. This is because the authentication operator has to reconfigure and reconcile the pods that are responsible for authentication to the cluster.
In a web browser, navigate to the Azure Red Hat OpenShift login page. You should have this value stored
in the environment as the AZ_CONSOLE variable from
this step
.
NOTE The below image shows both the
crdanduiprofiles as this documentation was put together while doing both side-by-side. You should see one or the other.
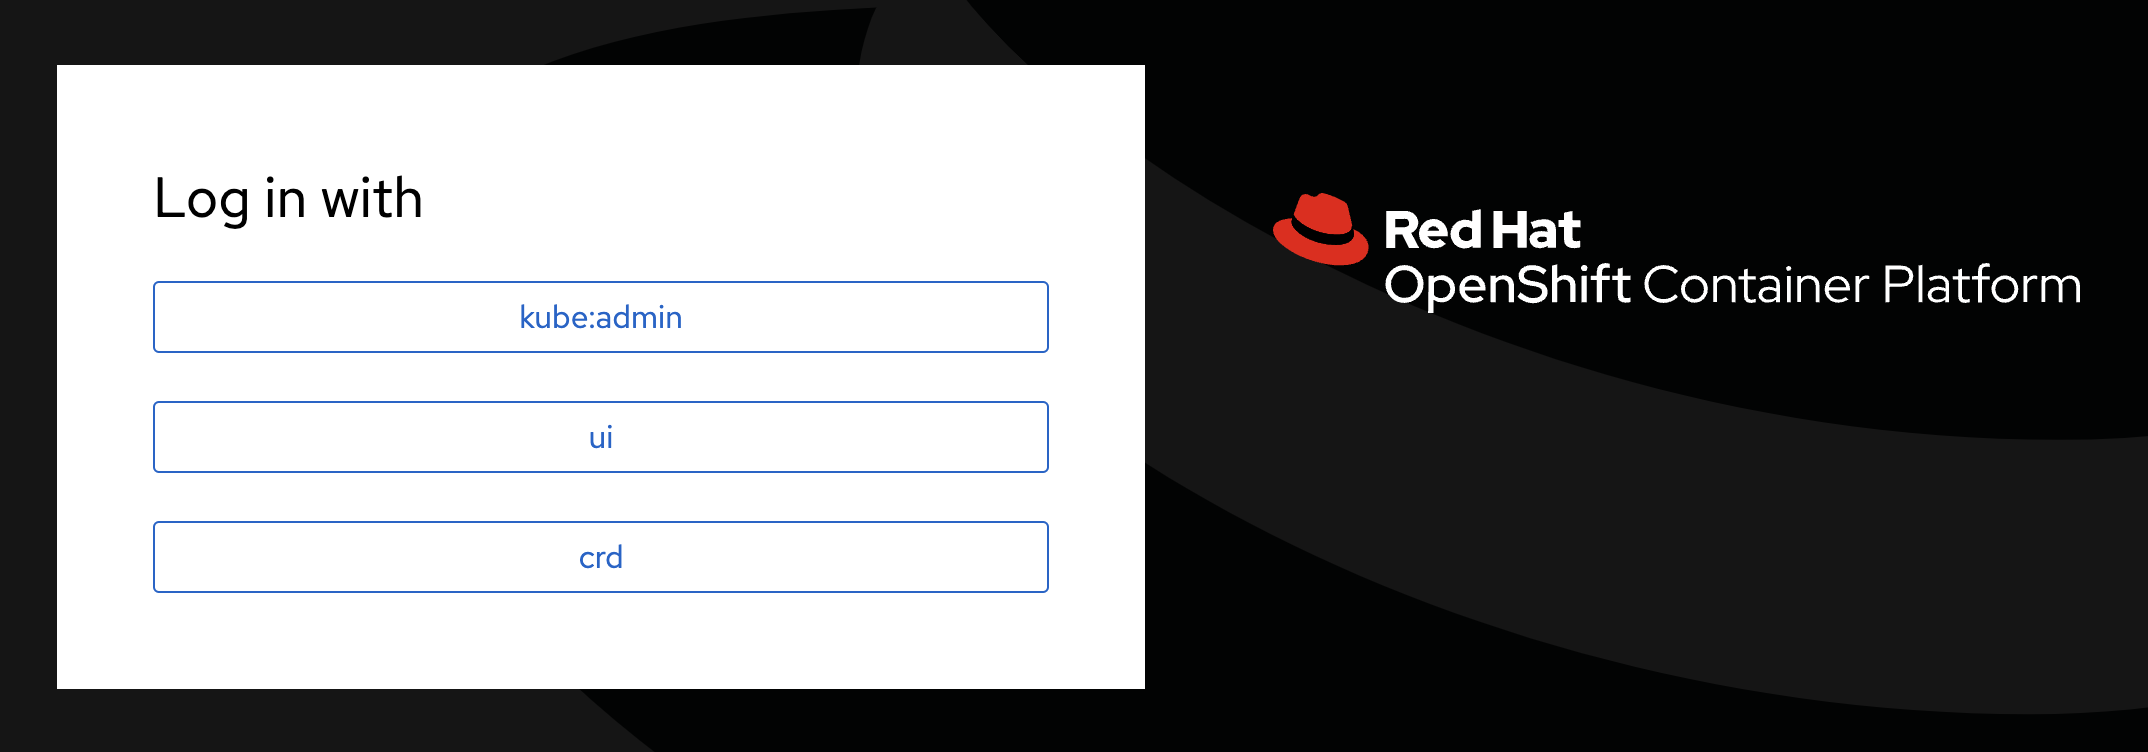
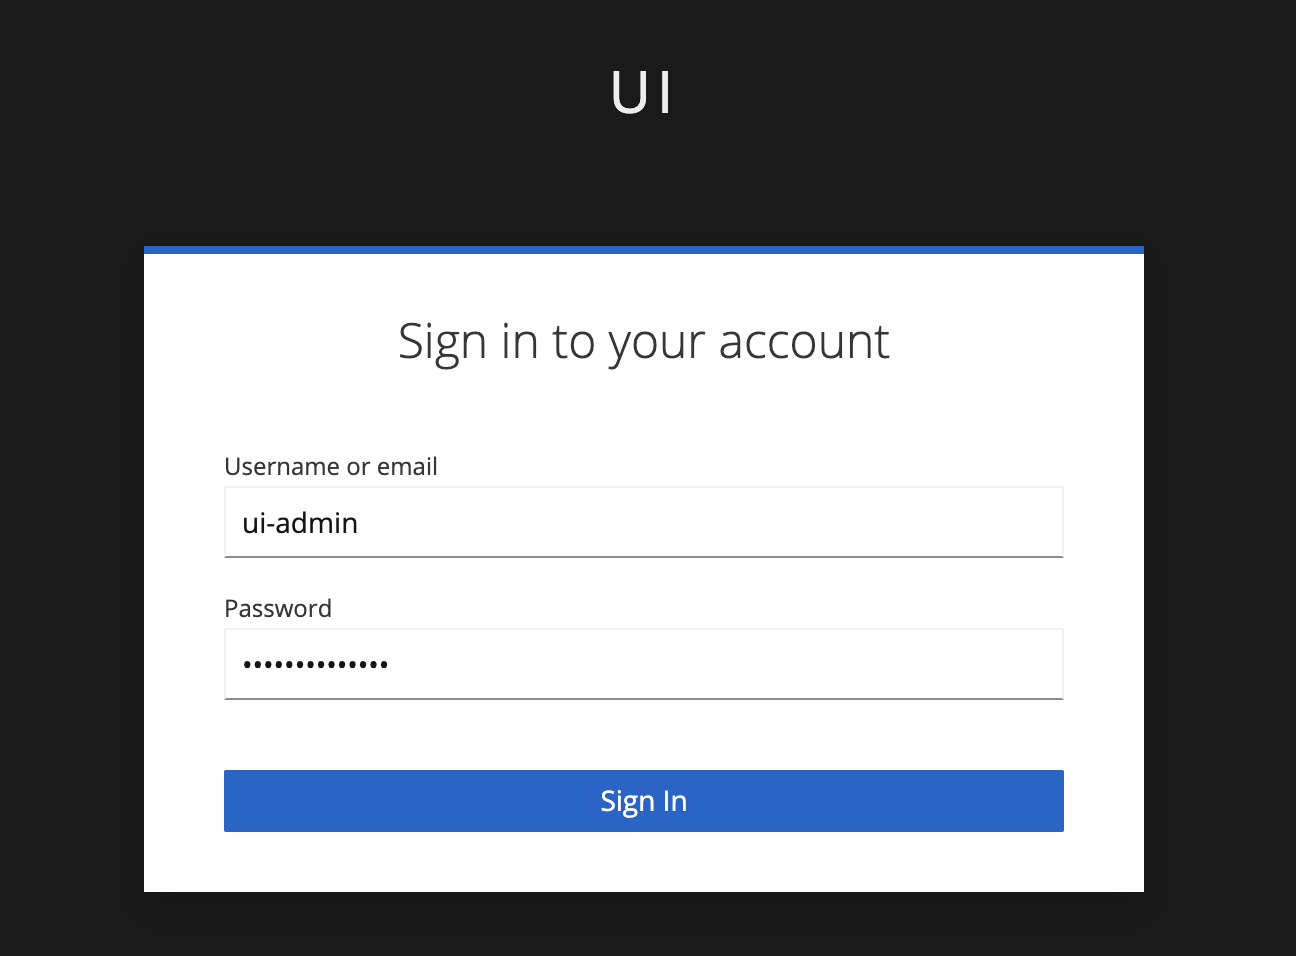
Select the appropriate provider, and input your username and password:
Congratulations, you are now logged into the OpenShift Console with your user! Let’s take a look at the identities in the cluster:
oc get identities
NAME                                       IDP NAME   IDP USER NAME                          USER NAME          USER UID
crd:de24ecb0-0475-42ce-b69b-bb3a80d6b633   crd        de24ecb0-0475-42ce-b69b-bb3a80d6b633   crd-admin          88871fcc-74d1-486f-99ca-8dae17f72834
ui:7937fa9c-6231-42e0-8cd4-666990baeef7    ui         7937fa9c-6231-42e0-8cd4-666990baeef7   ui-admin           1a6a8150-5fb7-4031-a00c-5ab0a2c8c2b2

oc get users
NAME                       UID                                    FULL NAME      IDENTITIES
crd-admin                  88871fcc-74d1-486f-99ca-8dae17f72834   CRD Admin      crd:de24ecb0-0475-42ce-b69b-bb3a80d6b633
ui-admin                   1a6a8150-5fb7-4031-a00c-5ab0a2c8c2b2   UI Admin       ui:7937fa9c-6231-42e0-8cd4-666990baeef7
Just a reminder that you only have Developer permissions when logged in at this point. If you need this user to have elevated permissions within OpenShift, you can use standard Kubernetes RBAC procedures to assign permissions to your user.
Configure Azure AD
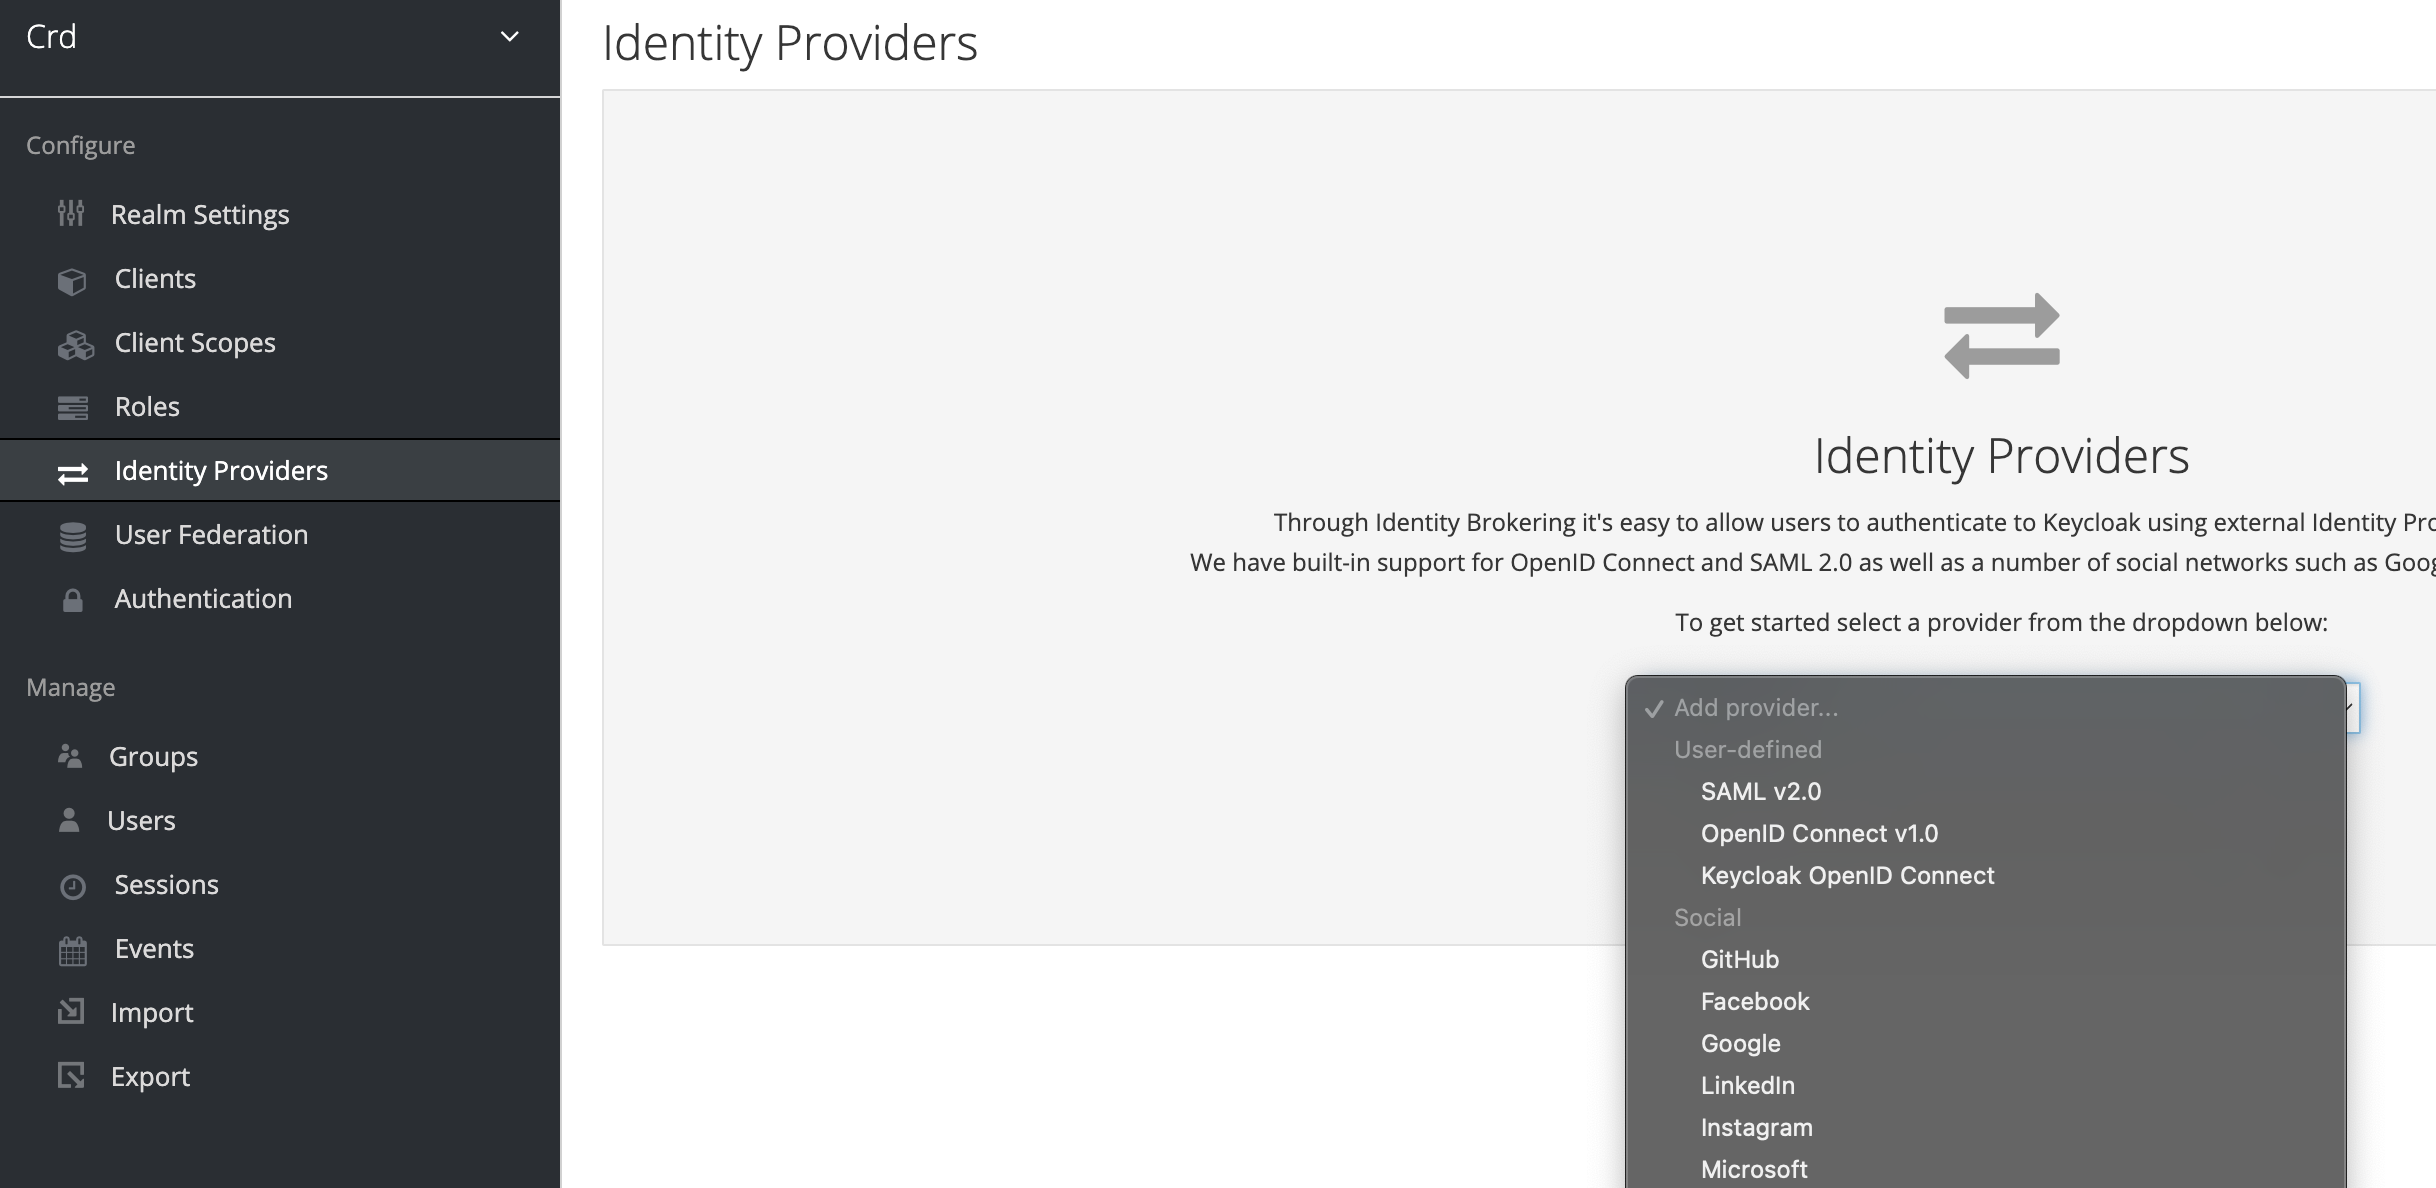
- Login to the Red Hat SSO UI, navigate to your realm, and select
Identity Providers > Add Provider > Microsoft:
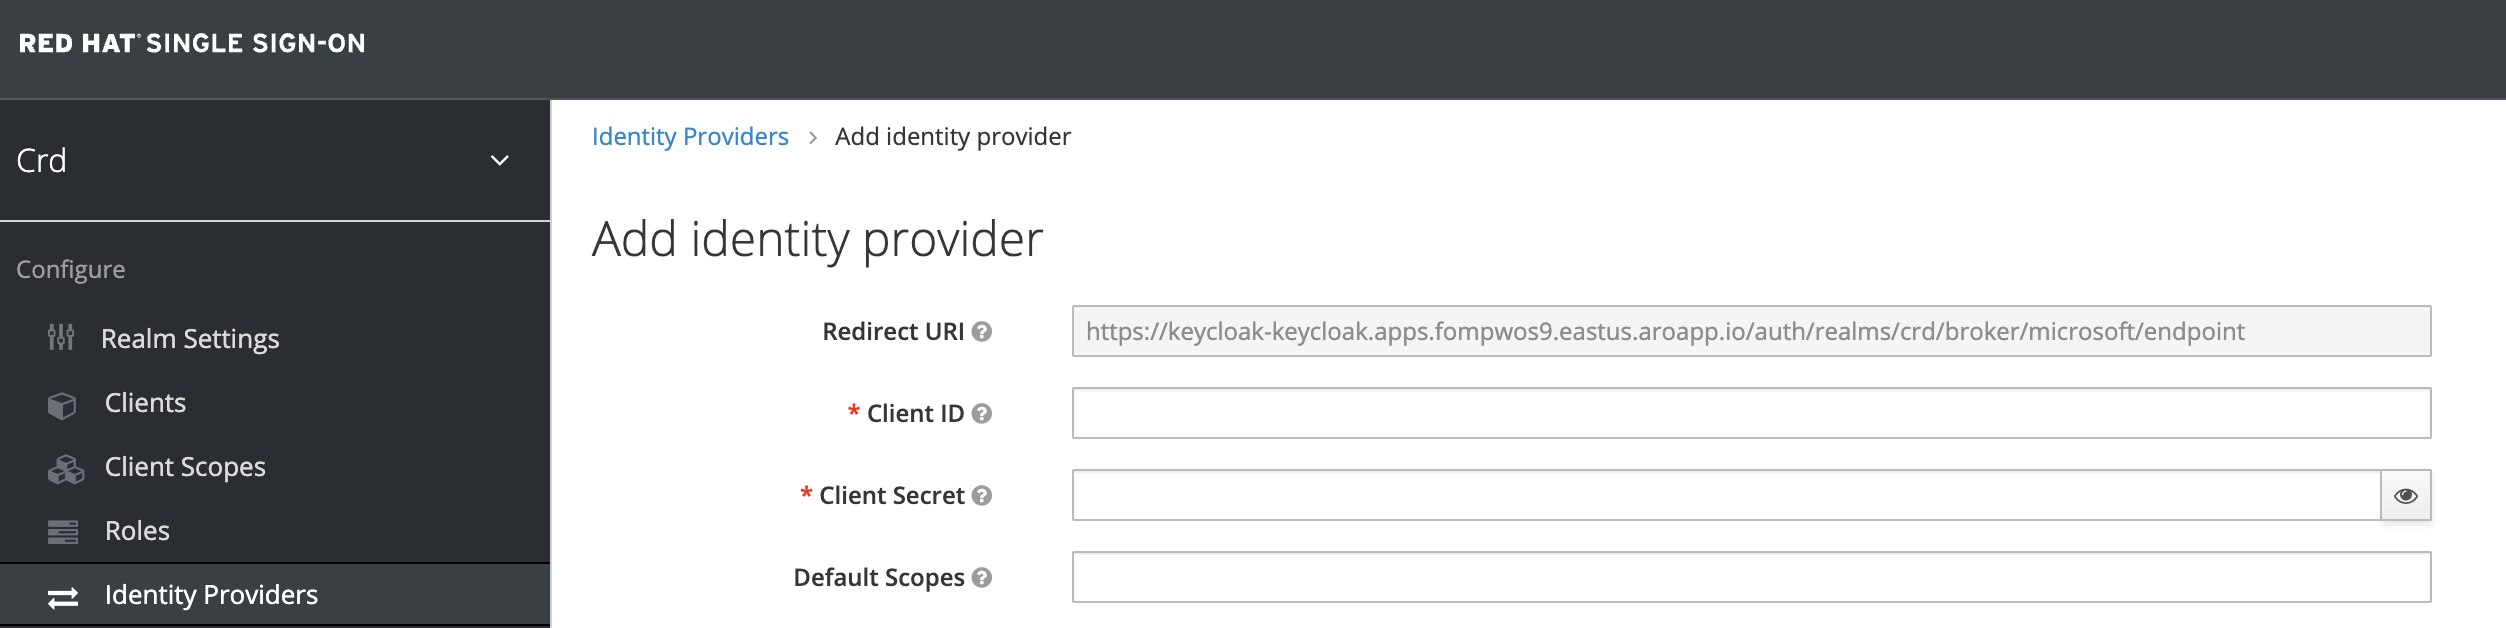
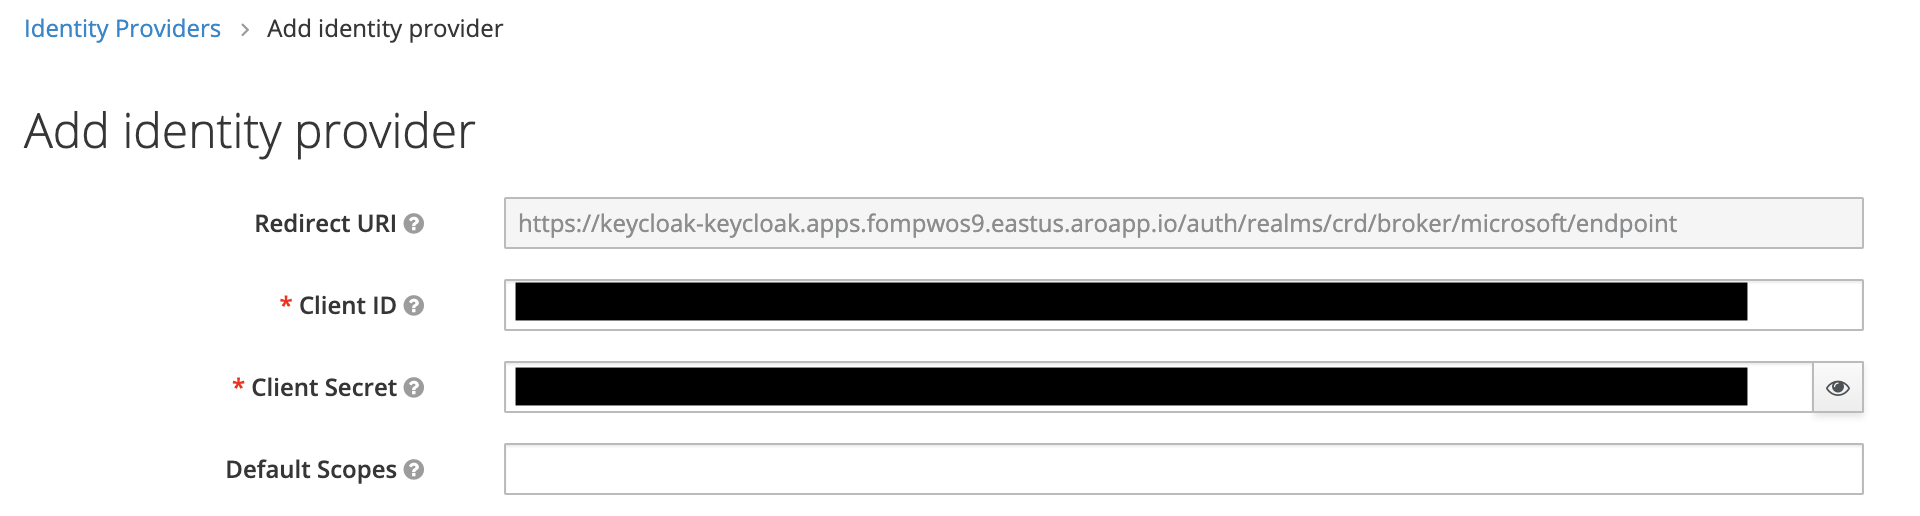
- Capture the
Redirect URIfrom this screen. You will need it to register Red Hat SSO as an application in Azure AD. Once you have captured the URI, leave this screen up while we configure Azure AD:
Register an application in Azure AD for Red Hat SSO .
Be sure to use the redirect URI captured in the last step when setting this up. Also be sure to take note of the client ID and client secret as those will be used to finish configuration in Red Hat SSO.Enable optional claims and enable necessary Microsoft Graph permissions .
Input the client ID and client secret from the application registration into the identity provider:
Test Login to OpenShift with Azure AD Credentials
In a web browser, navigate to the Azure Red Hat OpenShift login page. You should have this value stored
in the environment as the AZ_CONSOLE variable from
this step
.
NOTE The below image shows both the
crdanduiprofiles as this documentation was put together while doing both side-by-side. You should see one or the other.
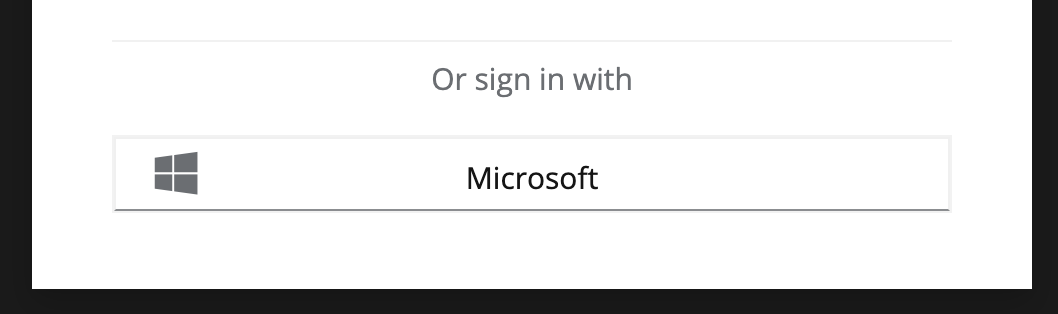
Select the appropriate provider. You should now see an option to login with your Microsoft credentials:
Congratulations, you are now logged into the OpenShift Console with your Azure AD user, using Red Hat SSO as a federated identity source! Let’s take a look at the identities in the cluster:
oc get identities
NAME                                       IDP NAME   IDP USER NAME                          USER NAME                         USER UID
crd:de24ecb0-0475-42ce-b69b-bb3a80d6b633   crd        de24ecb0-0475-42ce-b69b-bb3a80d6b633   crd-admin                         88871fcc-74d1-486f-99ca-8dae17f72834
ui:7937fa9c-6231-42e0-8cd4-666990baeef7    ui         7937fa9c-6231-42e0-8cd4-666990baeef7   ui-admin                          1a6a8150-5fb7-4031-a00c-5ab0a2c8c2b2
sso:2d9a2753-f069-4286-9f1d-f1cfb80b0857   ui         2d9a2753-f069-4286-9f1d-f1cfb80b0857   dustin@mydomain.onmicrosoft.com   c856d652-b865-4c03-82a2-24fc429d08be

oc get users
NAME                              UID                                    FULL NAME      IDENTITIES
crd-admin                         88871fcc-74d1-486f-99ca-8dae17f72834   CRD Admin      crd:de24ecb0-0475-42ce-b69b-bb3a80d6b633
ui-admin                          1a6a8150-5fb7-4031-a00c-5ab0a2c8c2b2   UI Admin       ui:7937fa9c-6231-42e0-8cd4-666990baeef7
dustin@mydomain.onmicrosoft.com   c856d652-b865-4c03-82a2-24fc429d08be   Dustin Scott   ui:2d9a2753-f069-4286-9f1d-f1cfb80b0857
Just a reminder that you only have Developer permissions when logged in at this point. If you need this user to have elevated permissions within OpenShift, you can use standard Kubernetes RBAC procedures to assign permissions to your user.