Deploying Private ARO clusters with Custom Domains
This content is authored by Red Hat experts, but has not yet been tested on every supported configuration.
Overview
By default Azure Red Hat OpenShift uses self-signed certificates for all of the routes created on *.apps.<random>.<location>.aroapp.io.
Many companies also seek to leverage the capabilities of Azure Red Hat OpenShift (ARO) to deploy their applications while using their own custom domain. By utilizing ARO’s custom domain feature, companies can ensure hosting their applications under their own domain name.
If we choose to specify a custom domain, for example aro.myorg.com, the OpenShift console will be available at a URL such as https://console-openshift-console.apps.aro.myorg.com, instead of the built-in domain https://console-openshift-console.apps.<random>.<location>.aroapp.io.
Furthermore, if we choose Custom DNS, after connecting to the cluster, we will need to configure a custom certificate for our ARO ingress controller and custom certificate of our API server.
Prerequisites
Set the following environment variables:
export AZR_PULL_SECRET=~/Downloads/pull-secret.txt
export NETWORK_SUBNET=10.0.0.0/20
export CONTROL_SUBNET=10.0.0.0/24
export MACHINE_SUBNET=10.0.1.0/24
export JUMPHOST_SUBNET=10.0.3.0/24
export NAMESPACE=aro-custom-domain
export AZR_CLUSTER=aro-$USER
export AZR_RESOURCE_LOCATION=eastus
export AZR_RESOURCE_GROUP=aro-$USER-rg
export DOMAIN="aroplay.openshiftdemo.dev"
export AZR_DNS_RESOURCE_GROUP="mobb-dns"
export EMAIL=username.taken@gmail.com
1. ARO cluster networking
Before deploying Azure Red Hat OpenShift (ARO), there are certain prerequisites that need to be fulfilled.
1.1 Variables and Resource Group
Create an Azure resource group:
az group create                \
  --name $AZR_RESOURCE_GROUP   \
  --location $AZR_RESOURCE_LOCATION
1.2 ARO Networking prerequisites
Create virtual network:
az network vnet create                                    \
  --address-prefixes $NETWORK_SUBNET                      \
  --name "$AZR_CLUSTER-aro-vnet-$AZR_RESOURCE_LOCATION"   \
  --resource-group $AZR_RESOURCE_GROUP
Create control plane subnet:
az network vnet subnet create                                     \
  --resource-group $AZR_RESOURCE_GROUP                            \
  --vnet-name "$AZR_CLUSTER-aro-vnet-$AZR_RESOURCE_LOCATION"      \
  --name "$AZR_CLUSTER-aro-control-subnet-$AZR_RESOURCE_LOCATION" \
  --address-prefixes $CONTROL_SUBNET                              \
  --service-endpoints Microsoft.ContainerRegistry
Create machine subnet:
az network vnet subnet create                                       \
  --resource-group $AZR_RESOURCE_GROUP                              \
  --vnet-name "$AZR_CLUSTER-aro-vnet-$AZR_RESOURCE_LOCATION"        \
  --name "$AZR_CLUSTER-aro-machine-subnet-$AZR_RESOURCE_LOCATION"   \
  --address-prefixes $MACHINE_SUBNET                                \
  --service-endpoints Microsoft.ContainerRegistry
Disable network policies for Private Link Service on the control plane subnet:
az network vnet subnet update                                       \
  --name "$AZR_CLUSTER-aro-control-subnet-$AZR_RESOURCE_LOCATION"   \
  --resource-group $AZR_RESOURCE_GROUP                              \
  --vnet-name "$AZR_CLUSTER-aro-vnet-$AZR_RESOURCE_LOCATION"        \
  --disable-private-link-service-network-policies true
1.3 Creating Private ARO Clusters with Custom Domain:
Create private ARO Cluster with Custom Domain:
When the –domain flag with an FQDN (e.g. my.domain.com) is used to create your cluster you will need to configure DNS and a certificate authority for your API server and apps ingress. This will be done once we establish connectivity to the cluster.
az aro create \
--resource-group $AZR_RESOURCE_GROUP \
--name $AZR_CLUSTER \
--vnet "$AZR_CLUSTER-aro-vnet-$AZR_RESOURCE_LOCATION" \
--master-subnet "$AZR_CLUSTER-aro-control-subnet-$AZR_RESOURCE_LOCATION" \
--worker-subnet "$AZR_CLUSTER-aro-machine-subnet-$AZR_RESOURCE_LOCATION" \
--apiserver-visibility Private \
--ingress-visibility Private \
--pull-secret @$AZR_PULL_SECRET \
--domain $DOMAIN
1.4 Jumphost
As the cluster operates within a private network, it is possible to create a Jump host during the cluster creation process. This Jump host serves as a secure gateway that allows authorized users to connect to the private cluster environment.
Create Jumphost subnet:
az network vnet subnet create                                \
  --resource-group $AZR_RESOURCE_GROUP                       \
  --vnet-name "$AZR_CLUSTER-aro-vnet-$AZR_RESOURCE_LOCATION" \
  --name JumpSubnet                                          \
  --address-prefixes $JUMPHOST_SUBNET                        \
  --service-endpoints Microsoft.ContainerRegistry
Create a Jumphost:
az vm create --name jumphost                 \
    --resource-group $AZR_RESOURCE_GROUP     \
    --ssh-key-values $HOME/.ssh/id_rsa.pub   \
    --admin-username aro                     \
    --image "RedHat:RHEL:9_1:9.1.2022112113" \
    --subnet JumpSubnet                      \
    --public-ip-address jumphost-ip          \
    --public-ip-sku Standard                 \
    --vnet-name "$AZR_CLUSTER-aro-vnet-$AZR_RESOURCE_LOCATION"
Save the jump host public IP address:
JUMP_IP=$(az vm list-ip-addresses -g $AZR_RESOURCE_GROUP -n jumphost -o tsv \
    --query '[].virtualMachine.network.publicIpAddresses[0].ipAddress')
  echo $JUMP_IP
Use sshuttle to create a ssh vpn via the jump host as a daemon:
sshuttle --dns -NHr "aro@${JUMP_IP}" 10.0.0.0/8 --daemon
2. Configure DNS for the Private ARO Cluster (Ingress Router and API)
Properly configuring DNS for the default ingress router, API server endpoint, and associated routes such as the console and *.apps is of utmost importance.
These DNS configurations ensure easy access to the cluster’s console, application routes, and APIs, facilitating smooth administration and interaction with the OpenShift/Kubernetes environment.
2.1 Configure DNS for default ingress router
We need to configure the DNS for the Default Ingress Router (*.apps), to be able to access to the ARO Console, among other things.
Retrieve the Ingress IP for Azure DNS records:
INGRESS_IP="$(az aro show -n $AZR_CLUSTER -g $AZR_RESOURCE_GROUP --query 'ingressProfiles[0].ip' -o tsv)"

echo $INGRESS_IP
2.1.1 Apps/Console Public Zone Ingress Configuration
Create your Azure DNS zone for $DOMAIN:
NOTE: Alternatively you can use an existing zone if it exists. You need to have configured your domain name registrar to point to this zone.
az network dns zone create -g $RESOURCEGROUP -n $DOMAIN

az network dns zone create --parent-name $DOMAIN -g $AZR_DNS_RESOURCE_GROUP -n $DOMAIN
Add a record type A pointing the “*.apps.DOMAIN” to the Ingress LB IP, that is the Azure LB that balances the ARO/OpenShift Routers (Haproxies):
az network dns record-set a add-record \
  -g $AZR_DNS_RESOURCE_GROUP \
  -z $DOMAIN \
  -n '*.apps' \
  -a $INGRESS_IP
Adjust default TTL from 1 hour (choose an appropriate value, here 5 mins is used):
az network dns record-set a update -g $AZR_DNS_RESOURCE_GROUP -z $DOMAIN -n '*.apps' --set ttl=300Test the *.apps domain:
dig +short test.apps.$DOMAIN
2.2 Configure DNS for API server endpoint
We need to configure the DNS for the Kubernetes / OpenShift API of the ARO cluster, to be able to access to the ARO API.
Retrieve the API Server IP for Azure DNS records:
API_SERVER_IP="$(az aro show -n $AZR_CLUSTER -g $AZR_RESOURCE_GROUP --query 'apiserverProfile.ip' -o tsv)"
echo $API_SERVER_IP
Create an
apiA record to point to the Ingress Load Balancer IP:az network dns record-set a add-record \ -g $AZR_DNS_RESOURCE_GROUP \ -z $DOMAIN \ -n 'api' \ -a $API_SERVER_IPOptional (good for initial testing): Adjust default TTL from 1 hour (choose an appropriate value, here 5 mins is used):
az network dns record-set a update \
  -g $AZR_DNS_RESOURCE_GROUP \
  -z $DOMAIN \
  -n 'api' \
  --set ttl=300
Test the api domain:
dig +short api.$DOMAIN
3. Generate Let’s Encrypt Certificates for API Server and default Ingress Router
The following example employs manually created Let’s Encrypt certificates. However, it’s important to note that this is not recommended for production environments unless an automated process has been established for the generation and renewal of these certificates (for instance, through the use of the Cert-Manager operator).
Keep in mind that these certificates are subject to expiry after 90 days.
NOTE: this method relies on public DNS for the issuance of certificates since it uses a DNS challenge. Once the certificates have been issued, if desired, the public records can be removed (this could be the case if you’ve created a private ARO cluster and plan to use Azure DNS private record sets).
3.1 Generate LE Certs for default Ingress Router (*.apps/console)
Create TLS Key Pair for the apps/console domain using certbot:
export SCRATCH_DIR=/tmp/scratch

certbot certonly --manual \
  --preferred-challenges=dns \
  --email $EMAIL \
  --server https://acme-v02.api.letsencrypt.org/directory \
  --agree-tos \
  --config-dir "$SCRATCH_DIR/config" \
  --work-dir "$SCRATCH_DIR/work" \
  --logs-dir "$SCRATCH_DIR/logs" \
  -d "*.apps.$DOMAIN"
Take note of the Domain and TXT value fields as these are required for Let’s Encrypt to validate that you own the domain and can therefore issue you the certificates.
NOTE: don’t close or interrupt this process, we will finish after the dns challenge with.
Open a second terminal and paste the DNS_Challenge (You will need to rexport the variables from the beginning in this new terminal):
export APPS_TXT_RECORD="xxxx"You can add the necessary records to validate ownership of the apps domain:
az network dns record-set txt add-record \
  -g $AZR_DNS_RESOURCE_GROUP \
  -z $DOMAIN \
  -n "_acme-challenge.apps" \
  -v $APPS_TXT_RECORD
Update the TTL for the records from 1h to 5minutes to testing purposes:
az network dns record-set txt update \
  -g $AZR_DNS_RESOURCE_GROUP \
  -z $DOMAIN \
  -n "_acme-challenge.apps" \
  --set ttl=300
Make sure that you get the TXT record from the Azure domain challenge is registered and propagated properly:
dig +short TXT _acme-challenge.apps.$DOMAINReturn to the first terminal (where the certbot is), and finish the generation of the apps certificate PKIs for the ARO cluster.
3.2 Generate LE Certs for the api
Create TLS Key Pair for the api domain using certbot:
NOTE: don’t close or interrupt this process, we will finish after the dns challenge with the certbot.
export SCRATCH_DIR=/tmp/scratch

certbot certonly --manual \
  --preferred-challenges=dns \
  --email $EMAIL \
  --server https://acme-v02.api.letsencrypt.org/directory \
  --agree-tos \
  --config-dir "$SCRATCH_DIR/config" \
  --work-dir "$SCRATCH_DIR/work" \
  --logs-dir "$SCRATCH_DIR/logs" \
  -d "api.$DOMAIN"
Open the second terminal from earlier and paste the DNS_Challenge:
export API_TXT_RECORD="xxxx"You can add the necessary records to validate ownership of the api domain:
az network dns record-set txt add-record \
  -g $AZR_DNS_RESOURCE_GROUP \
  -z $DOMAIN \
  -n "_acme-challenge.api" \
  -v $API_TXT_RECORD
Adjust default TTL from 1 hour (choose an appropriate value, here 5 mins is used):
az network dns record-set txt update \
  -g $AZR_DNS_RESOURCE_GROUP \
  -z $DOMAIN \
  -n "_acme-challenge.api" \
  --set ttl=300
Make sure that you get the TXT record from the Azure domain challenge is registered and propagated properly:
dig +short TXT _acme-challenge.api.$DOMAINReturn to the first terminal (where the certbot is), and finish the generation of the API certificate PKIs for the ARO cluster.
4.1 Configure the Ingress Router with custom certificates
By default, the OpenShift Container Platform uses the Ingress Operator to generate an internal Certificate Authority (CA) and issue a wildcard certificate, which is valid for applications under the .apps sub-domain. This certificate is used by both the web console and CLI.
You can replace the default ingress certificate for all applications under the .apps subdomain. After you replace the certificate, all applications, including the web console and CLI, will have encryption provided by specified certificate.
Configure the API server with custom certificates:
AROPASS=$(az aro list-credentials --name $AZR_CLUSTER --resource-group $AZR_RESOURCE_GROUP -o tsv --query kubeadminPassword)
AROURL=$(az aro show -g $AZR_RESOURCE_GROUP -n $AZR_CLUSTER --query apiserverProfile.url -o tsv)
Login to the ARO cluster with oc CLI:
Note: We are currently utilizing the “–insecure-skip-tls-verify=true” flag due to the presence of self-signed certificates in both the API and the default ingress controller (*.apps).
oc login -u kubeadmin -p $AROPASS --server=$AROURL --insecure-skip-tls-verify=trueCreate a config map that includes only the root CA certificate used to sign the wildcard certificate:
oc create configmap custom-ca \
    --from-file=$SCRATCH_DIR/config/live/apps.$DOMAIN/fullchain.pem \
    -n openshift-config
Update the cluster-wide proxy configuration with the newly created config map:
oc patch proxy/cluster \
    --type=merge \
    --patch='{"spec":{"trustedCA":{"name":"custom-ca"}}}'
Create a secret that contains the wildcard certificate chain and key:
oc create secret tls apps-custom-domain \
    --cert=$SCRATCH_DIR/config/live/apps.$DOMAIN/fullchain.pem \
    --key=$SCRATCH_DIR/config/live/apps.$DOMAIN/privkey.pem \
    -n openshift-ingress
Update the Ingress Controller configuration with the newly created secret:
oc patch ingresscontroller.operator default \
--type=merge -p \
'{"spec":{"defaultCertificate":{"name":"apps-custom-domain"}}}' \
-n openshift-ingress-operator
Check the OpenShift Ingress pods:
oc get pod -n openshift-ingressVerify that your certificate it’s correctly applied:
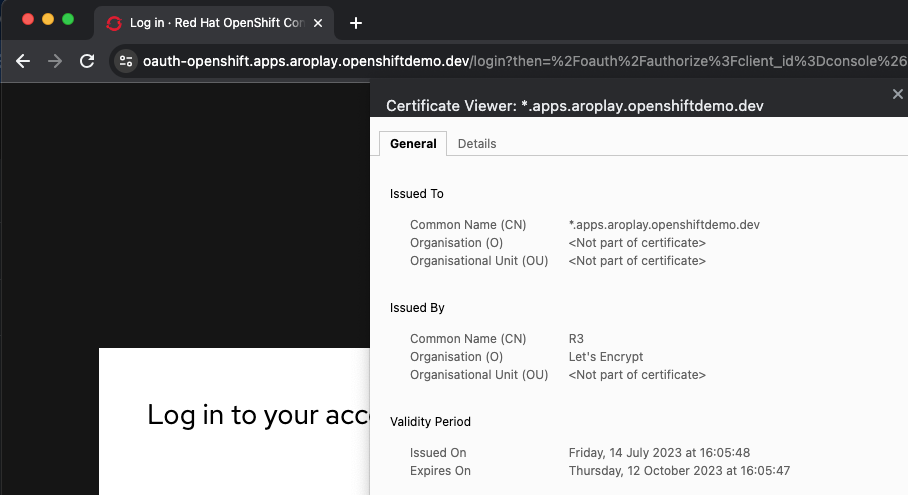
echo | openssl s_client -connect console-openshift-console.apps.$DOMAIN:443 | openssl x509 -noout -text | grep IssuerCheck that the Certificate when you access to the Console is the Cert issued by Let’s Encrypt using Certbot:
4.2 Configure the API server with custom certificates
Create a secret that contains the certificate chain and private key in the openshift-config namespace:
oc create secret tls api-custom-domain-cert \
    --cert=$SCRATCH_DIR/config/live/api.$DOMAIN/fullchain.pem \
    --key=$SCRATCH_DIR/config/live/api.$DOMAIN/privkey.pem \
    -n openshift-config
Update the API server certificate to reference the created secret. Patch the cluster’s API server and replace
with your customer domain :oc patch apiserver cluster \ --type=merge -p \ '{"spec":{"servingCerts":{"namedCertificates": [{"names":["api.<DOMAIN>"], "servingCertificate":{"name":"api-custom-domain-cert"}}]}}}'Check the apiserver cluster CRD to check if the patch worked properly:
oc get apiserver cluster -o yamlAfter a couple of minutes, check the certificate exposed:
echo | openssl s_client -connect api.$DOMAIN:6443 | openssl x509 -noout -text | grep IssuerLogout and login without the “–insecure-skip-tls-verify=true”:
oc logout
oc login -u kubeadmin -p $AROPASS --server=$AROURL