Deploying Advanced Cluster Management and OpenShift Data Foundation for ARO Disaster Recovery
This content is authored by Red Hat experts, but has not yet been tested on every supported configuration.
A guide to deploying Advanced Cluster Management (ACM) and OpenShift Data Foundation (ODF) for Azure Red hat OpenShift (ARO) Disaster Recovery
Overview
VolSync is not supported for ARO in ACM: https://access.redhat.com/articles/7006295 so if you run into issues and file a support ticket, you will receive the information that ARO is not supported.
In today’s fast-paced and data-driven world, ensuring the resilience and availability of your applications and data has never been more critical. The unexpected can happen at any moment, and the ability to recover quickly and efficiently is paramount. That’s where OpenShift Advanced Cluster Management (ACM) and OpenShift Data Foundation (ODF) come into play. In this guide, we will explore the deployment of ACM and ODF for disaster recovery (DR) purposes, empowering you to safeguard your applications and data across multiple clusters.
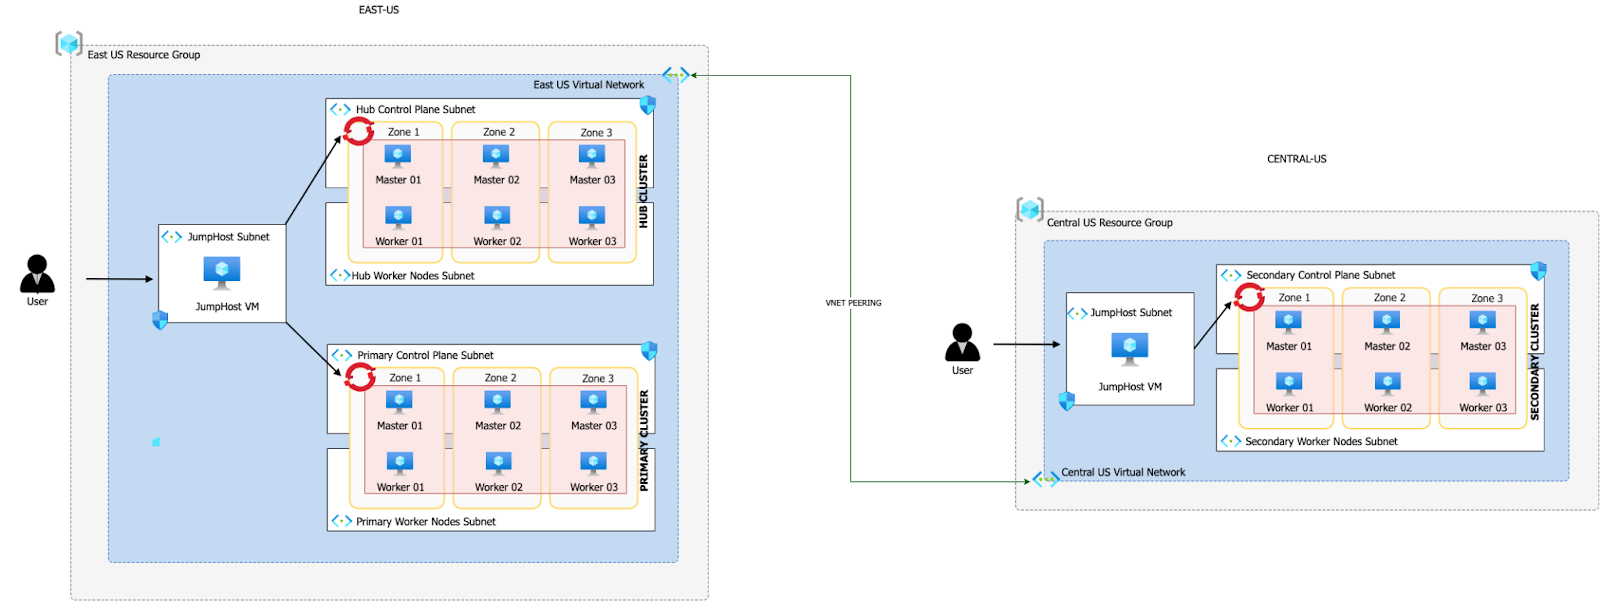
Sample Architecture
 Download a
Visio file
of this architecture
Download a
Visio file
of this architecture
Hub Cluster (East US Region):
- This is the central control and management cluster of your multi-cluster environment.
- It hosts Red Hat Advanced Cluster Management (ACM), which is a powerful tool for managing and orchestrating multiple OpenShift clusters.
- Within the Hub Cluster, you have MultiClusterHub, which is a component of ACM that facilitates the management of multiple OpenShift clusters from a single control point.
- Additionally, you have OpenShift Data Foundation (ODF) Multicluster Orchestrator in the Hub Cluster. ODF provides data storage, management, and services across clusters.
- The Hub Cluster shares the same Virtual Network (VNET) with the Primary Cluster, but they use different subnets within that VNET.
- VNET peering is established between the Hub Cluster’s VNET and the Secondary Cluster’s dedicated VNET in the Central US region. This allows communication between the clusters.
Primary Cluster (East US Region):
- This cluster serves as the primary application deployment cluster.
- It has the Submariner Add-On, which is a component that enables network connectivity and service discovery between clusters.
- ODF is also deployed in the Primary Cluster, providing storage and data services to applications running in this cluster.
- By using Submariner and ODF in the Primary Cluster, you enhance the availability and data management capabilities of your applications.
Secondary Cluster (Central US Region):
- This cluster functions as a secondary or backup cluster for disaster recovery (DR) purposes.
- Similar to the Primary Cluster, it has the Submariner Add-On to establish network connectivity.
- ODF is deployed here as well, ensuring that data can be replicated and managed across clusters.
- The Secondary Cluster resides in its own dedicated VNET in the Central US region.
In summary, this multi-cluster topology is designed for high availability and disaster recovery. The Hub Cluster with ACM and ODF Multicluster Orchestrator serves as the central control point for managing and orchestrating the Primary and Secondary Clusters. The use of Submariner and ODF in both the Primary and Secondary Clusters ensures that applications can seamlessly failover to the Secondary Cluster in the event of a disaster, while data remains accessible and consistent across all clusters. The VNET peering between clusters enables secure communication and data replication between regions.
Prerequisites
Azure Account
Log into the Azure CLI by running the following and then authorizing through your Web Browser
az loginMake sure you have enough Quota (change the location if you’re not using East US)
az vm list-usage --location "East US" -o tableSee Addendum - Adding Quota to ARO account if you have less than 36 Quota left for Total Regional vCPUs.
Register resource providers
az provider register -n Microsoft.RedHatOpenShift --wait
az provider register -n Microsoft.Compute --wait
az provider register -n Microsoft.Storage --wait
az provider register -n Microsoft.Authorization --wait
Red Hat pull secret
- Log into https://cloud.redhat.com
- Browse to https://cloud.redhat.com/openshift/install/azure/aro-provisioned
- Click the Download pull secret button and remember where you saved it, you’ll reference it later.
Manage Multiple Logins
In order to manage several clusters, we will add a new Kubeconfig file to manage the logins and change quickly from one context to another
rm -rf /var/tmp/acm-odf-aro-kubeconfig
touch /var/tmp/acm-odf-aro-kubeconfig
export KUBECONFIG=/var/tmp/acm-odf-aro-kubeconfig
Create clusters
Set environment variables
export AZR_PULL_SECRET=~/Downloads/pull-secret.txt
export EAST_RESOURCE_LOCATION=eastus
export EAST_RESOURCE_GROUP=rg-eastus
export CENTRAL_RESOURCE_LOCATION=centralus
export CENTRAL_RESOURCE_GROUP=rg-centralus
Create environment variables for hub cluster
export HUB_VIRTUAL_NETWORK=10.0.0.0/20
export HUB_CLUSTER=hub-cluster
export HUB_CONTROL_SUBNET=10.0.0.0/24
export HUB_WORKER_SUBNET=10.0.1.0/24
export HUB_JUMPHOST_SUBNET=10.0.10.0/24
Set environment variables for primary cluster
export PRIMARY_CLUSTER=primary-cluster
export PRIMARY_CONTROL_SUBNET=10.0.2.0/24
export PRIMARY_WORKER_SUBNET=10.0.3.0/24
export PRIMARY_POD_CIDR=10.128.0.0/18
export PRIMARY_SERVICE_CIDR=172.30.0.0/18
Set environment variables for secondary cluster
Note: Pod and Service CIDRs CANNOT overlap between primary and secondary clusters (because we are using Submariner). So we will use the parameters “–pod-cidr” and “–service-cidr” to avoid using the default ranges. Details about POD and Service CIDRs are available here .
export SECONDARY_CLUSTER=secondary-cluster
export SECONDARY_VIRTUAL_NETWORK=192.168.0.0/20
export SECONDARY_CONTROL_SUBNET=192.168.0.0/24
export SECONDARY_WORKER_SUBNET=192.168.1.0/24
export SECONDARY_JUMPHOST_SUBNET=192.168.10.0/24
export SECONDARY_POD_CIDR=10.130.0.0/18
export SECONDARY_SERVICE_CIDR=172.30.128.0/18
Deploying the Hub Cluster
Create an Azure resource group
az group create  \
  --name $EAST_RESOURCE_GROUP  \
  --location $EAST_RESOURCE_LOCATION
Create virtual network
az network vnet create  \
  --address-prefixes $HUB_VIRTUAL_NETWORK  \
  --name "$HUB_CLUSTER-aro-vnet-$EAST_RESOURCE_LOCATION"  \
  --resource-group $EAST_RESOURCE_GROUP
Create control plane subnet
az network vnet subnet create  \
  --resource-group $EAST_RESOURCE_GROUP  \
  --vnet-name "$HUB_CLUSTER-aro-vnet-$EAST_RESOURCE_LOCATION"  \
  --name "$HUB_CLUSTER-aro-control-subnet-$EAST_RESOURCE_LOCATION"  \
  --address-prefixes $HUB_CONTROL_SUBNET
Create worker subnet
az network vnet subnet create  \
  --resource-group $EAST_RESOURCE_GROUP  \
  --vnet-name "$HUB_CLUSTER-aro-vnet-$EAST_RESOURCE_LOCATION"  \
  --name "$HUB_CLUSTER-aro-worker-subnet-$EAST_RESOURCE_LOCATION"  \
  --address-prefixes $HUB_WORKER_SUBNET
Create the cluster
This will take between 30 and 45 minutes
az aro create  \
    --resource-group $EAST_RESOURCE_GROUP  \
    --name $HUB_CLUSTER  \
    --vnet "$HUB_CLUSTER-aro-vnet-$EAST_RESOURCE_LOCATION"  \
    --master-subnet "$HUB_CLUSTER-aro-control-subnet-$EAST_RESOURCE_LOCATION"  \
    --worker-subnet "$HUB_CLUSTER-aro-worker-subnet-$EAST_RESOURCE_LOCATION"  \
    --version 4.12.25  \
    --apiserver-visibility Private  \
    --ingress-visibility Private  \
    --pull-secret @$AZR_PULL_SECRET
Deploying the Primary cluster
Create control plane subnet
az network vnet subnet create  \
  --resource-group $EAST_RESOURCE_GROUP  \
  --vnet-name "$HUB_CLUSTER-aro-vnet-$EAST_RESOURCE_LOCATION"  \
  --name "$PRIMARY_CLUSTER-aro-control-subnet-$EAST_RESOURCE_LOCATION"  \
  --address-prefixes $PRIMARY_CONTROL_SUBNET
Create worker subnet
az network vnet subnet create  \
  --resource-group $EAST_RESOURCE_GROUP  \
  --vnet-name "$HUB_CLUSTER-aro-vnet-$EAST_RESOURCE_LOCATION"  \
  --name "$PRIMARY_CLUSTER-aro-worker-subnet-$EAST_RESOURCE_LOCATION"  \
  --address-prefixes $PRIMARY_WORKER_SUBNET
Create the cluster
This will take between 30 and 45 minutes
az aro create  \
  --resource-group $EAST_RESOURCE_GROUP  \
  --name $PRIMARY_CLUSTER  \
  --vnet "$HUB_CLUSTER-aro-vnet-$EAST_RESOURCE_LOCATION"  \
  --master-subnet "$PRIMARY_CLUSTER-aro-control-subnet-$EAST_RESOURCE_LOCATION"  \
  --worker-subnet "$PRIMARY_CLUSTER-aro-worker-subnet-$EAST_RESOURCE_LOCATION"  \
  --version 4.12.25  \
  --apiserver-visibility Private  \
  --ingress-visibility Private  \
  --pull-secret @$AZR_PULL_SECRET  \
  --pod-cidr $PRIMARY_POD_CIDR  \
  --service-cidr $PRIMARY_SERVICE_CIDR
Connect to Hub and Primary Clusters
With the cluster in a private network, we can create a jump host in order to connect to it.
Create the jump subnet
az network vnet subnet create  \
  --resource-group $EAST_RESOURCE_GROUP  \
  --vnet-name "$HUB_CLUSTER-aro-vnet-$EAST_RESOURCE_LOCATION"  \
  --name jump-subnet  \
  --address-prefixes $HUB_JUMPHOST_SUBNET
Create a jump host
az vm create --name jumphost  \
    --resource-group $EAST_RESOURCE_GROUP  \
    --ssh-key-values $HOME/.ssh/id_rsa.pub  \
    --admin-username aro  \
    --image "RedHat:RHEL:9_1:9.1.2022112113"  \
    --subnet jump-subnet  \
    --public-ip-address jumphost-ip  \
    --public-ip-sku Standard  \
    --vnet-name "$HUB_CLUSTER-aro-vnet-$EAST_RESOURCE_LOCATION"
Save the jump host public IP address
Run this command in a second terminal EAST_JUMP_IP=$(az vm list-ip-addresses -g $EAST_RESOURCE_GROUP -n jumphost -o tsv \ --query '[].virtualMachine.network.publicIpAddresses[0].ipAddress') echo $EAST_JUMP_IPUse sshuttle to create a SSH VPN via the jump host (use a separate terminal session)
Run this command in a second terminal Replace the IP with the IP of the jump box from the previous step
sshuttle --dns -NHr "aro@${EAST_JUMP_IP}" $HUB_VIRTUAL_NETWORKGet OpenShift API routes
HUB_APISERVER=$(az aro show  \
--name $HUB_CLUSTER  \
--resource-group $EAST_RESOURCE_GROUP  \
-o tsv --query apiserverProfile.url)

PRIMARY_APISERVER=$(az aro show  \
--name $PRIMARY_CLUSTER  \
--resource-group $EAST_RESOURCE_GROUP  \
-o tsv --query apiserverProfile.url)
Get OpenShift credentials
HUB_ADMINPW=$(az aro list-credentials  \
--name $HUB_CLUSTER  \
--resource-group $EAST_RESOURCE_GROUP  \
--query kubeadminPassword  \
-o tsv)

PRIMARY_ADMINPW=$(az aro list-credentials  \
--name $PRIMARY_CLUSTER  \
--resource-group $EAST_RESOURCE_GROUP  \
--query kubeadminPassword  \
-o tsv)
Log into Hub and configure context
oc login $HUB_APISERVER --username kubeadmin --password ${HUB_ADMINPW}
oc config rename-context $(oc config current-context) hub
oc config use hub
Log into Primary and configure context
oc login $PRIMARY_APISERVER --username kubeadmin --password ${PRIMARY_ADMINPW}
oc config rename-context $(oc config current-context) primary
oc config use primary
You can now switch between the hub and primary clusters with
oc config
Deploying the Secondary Cluster
Create an Azure resource group
az group create  \
  --name $CENTRAL_RESOURCE_GROUP  \
  --location $CENTRAL_RESOURCE_LOCATION
Create virtual network
az network vnet create  \
  --address-prefixes $SECONDARY_VIRTUAL_NETWORK  \
  --name "$SECONDARY_CLUSTER-aro-vnet-$CENTRAL_RESOURCE_LOCATION"  \
  --resource-group $CENTRAL_RESOURCE_GROUP
Create control plane subnet
az network vnet subnet create  \
  --resource-group $CENTRAL_RESOURCE_GROUP  \
  --vnet-name "$SECONDARY_CLUSTER-aro-vnet-$CENTRAL_RESOURCE_LOCATION"  \
  --name "$SECONDARY_CLUSTER-aro-control-subnet-$CENTRAL_RESOURCE_LOCATION"  \
  --address-prefixes $SECONDARY_CONTROL_SUBNET
Create worker subnet
az network vnet subnet create  \
  --resource-group $CENTRAL_RESOURCE_GROUP  \
  --vnet-name "$SECONDARY_CLUSTER-aro-vnet-$CENTRAL_RESOURCE_LOCATION"  \
  --name "$SECONDARY_CLUSTER-aro-worker-subnet-$CENTRAL_RESOURCE_LOCATION"  \
  --address-prefixes $SECONDARY_WORKER_SUBNET
Create the cluster
This will take between 30 and 45 minutes
az aro create  \
    --resource-group $CENTRAL_RESOURCE_GROUP  \
    --name $SECONDARY_CLUSTER  \
    --vnet "$SECONDARY_CLUSTER-aro-vnet-$CENTRAL_RESOURCE_LOCATION"  \
    --master-subnet "$SECONDARY_CLUSTER-aro-control-subnet-$CENTRAL_RESOURCE_LOCATION"  \
    --worker-subnet "$SECONDARY_CLUSTER-aro-worker-subnet-$CENTRAL_RESOURCE_LOCATION"  \
    --version 4.12.25  \
    --apiserver-visibility Private  \
    --ingress-visibility Private  \
    --pull-secret @$AZR_PULL_SECRET \
    --pod-cidr $SECONDARY_POD_CIDR \
    --service-cidr $SECONDARY_SERVICE_CIDR
VNet Peering
Create a peering between both VNETs (Hub Cluster in EastUS and Secondary Cluster in Central US)
export RG_EASTUS=$EAST_RESOURCE_GROUP
export RG_CENTRALUS=$CENTRAL_RESOURCE_GROUP
export VNET_EASTUS=$HUB_CLUSTER-aro-vnet-$EAST_RESOURCE_LOCATION
export VNET_CENTRALUS=$SECONDARY_CLUSTER-aro-vnet-$CENTRAL_RESOURCE_LOCATION

# Get the id for $VNET_EASTUS.
echo "Getting the id for $VNET_EASTUS"
VNET_EASTUS_ID=$(az network vnet show --resource-group $RG_EASTUS --name $VNET_EASTUS --query id --out tsv)

# Get the id for $VNET_CENTRALUS.
echo "Getting the id for $VNET_CENTRALUS"
VNET_CENTRALUS_ID=$(az network vnet show --resource-group $RG_CENTRALUS --name $VNET_CENTRALUS --query id --out tsv)

# Peer $VNET_EASTUS to $VNET_CENTRALUS.
echo "Peering $VNET_EASTUS to $VNET_CENTRALUS"
az network vnet peering create --name "Link"-$VNET_EASTUS-"To"-$VNET_CENTRALUS  \
  --resource-group $RG_EASTUS  \
  --vnet-name $VNET_EASTUS  \
  --remote-vnet $VNET_CENTRALUS_ID  \
  --allow-vnet-access=True  \
  --allow-forwarded-traffic=True  \
  --allow-gateway-transit=True

# Peer$VNET_CENTRALUS to $VNET_EASTUS.
echo "Peering $VNET_CENTRALUS to $VNET_EASTUS"
az network vnet peering create --name "Link"-$VNET_CENTRALUS-"To"-$VNET_EASTUS  \
  --resource-group $RG_CENTRALUS  \
  --vnet-name $VNET_CENTRALUS  \
  --remote-vnet $VNET_EASTUS_ID  \
  --allow-vnet-access  \
  --allow-forwarded-traffic=True  \
  --allow-gateway-transit=True
Connect to Secondary cluster
Since this cluster will reside in a different virtual network, we should create another jump host.
Create the jump subnet
az network vnet subnet create  \
  --resource-group $CENTRAL_RESOURCE_GROUP  \
  --vnet-name "$SECONDARY_CLUSTER-aro-vnet-$CENTRAL_RESOURCE_LOCATION"  \
  --name jump-subnet  \
  --address-prefixes $SECONDARY_JUMPHOST_SUBNET
Create a jump host
 az vm create --name jumphost  \
    --resource-group $CENTRAL_RESOURCE_GROUP  \
    --ssh-key-values $HOME/.ssh/id_rsa.pub  \
    --admin-username aro  \
    --image "RedHat:RHEL:9_1:9.1.2022112113"  \
    --subnet jump-subnet  \
    --public-ip-address jumphost-ip  \
    --public-ip-sku Standard  \
    --vnet-name "$SECONDARY_CLUSTER-aro-vnet-$CENTRAL_RESOURCE_LOCATION"
Save the jump host public IP address
Run this command in a second terminal CENTRAL_JUMP_IP=$(az vm list-ip-addresses -g $CENTRAL_RESOURCE_GROUP -n jumphost -o tsv \ --query '[].virtualMachine.network.publicIpAddresses[0].ipAddress') echo $CENTRAL_JUMP_IPUse sshuttle to create a SSH VPN via the jump host
Run this command in a second terminal Replace the IP with the IP of the jump box from the previous step
sshuttle --dns -NHr "aro@${CENTRAL_JUMP_IP}" $SECONDARY_VIRTUAL_NETWORKGet OpenShift API routes
SECONDARY_APISERVER=$(az aro show  \
--name $SECONDARY_CLUSTER  \
--resource-group $CENTRAL_RESOURCE_GROUP  \
-o tsv --query apiserverProfile.url)
Get OpenShift credentials
SECONDARY_ADMINPW=$(az aro list-credentials  \
--name $SECONDARY_CLUSTER  \
--resource-group $CENTRAL_RESOURCE_GROUP  \
--query kubeadminPassword  \
-o tsv)
Log into Secondary and configure context
oc login $SECONDARY_APISERVER --username kubeadmin --password ${SECONDARY_ADMINPW}
oc config rename-context $(oc config current-context) secondary
oc config use secondary
You can switch to the secondary cluster with
oc config
Setup Hub Cluster
Ensure you are in the right context
oc config use hub
Configure ACM
Create ACM namespace
cat << EOF | oc apply -f -
apiVersion: v1
kind: Namespace
metadata:
  name: open-cluster-management
  labels:
    openshift.io/cluster-monitoring: "true"
EOF
Create ACM Operator Group
cat << EOF | oc apply -f -
apiVersion: operators.coreos.com/v1
kind: OperatorGroup
metadata:
  name: open-cluster-management
  namespace: open-cluster-management
spec:
  targetNamespaces:
    - open-cluster-management
EOF
Install ACM version 2.8
cat << EOF | oc apply -f -
apiVersion: operators.coreos.com/v1alpha1
kind: Subscription
metadata:
  name: advanced-cluster-management
  namespace: open-cluster-management
spec:
  channel: release-2.8
  installPlanApproval: Automatic
  name: advanced-cluster-management
  source: redhat-operators
  sourceNamespace: openshift-marketplace
EOF
Check if installation succeeded
oc wait --for=jsonpath='{.status.phase}'='Succeeded' csv -n open-cluster-management \
  -l operators.coreos.com/advanced-cluster-management.open-cluster-management=''
If you get the following error, it means that the installation wasn’t completed yet. Wait 3-5 minutes and run the last command again.
error: no matching resources foundA successful output should be similar to:
clusterserviceversion.operators.coreos.com/advanced-cluster-management.v2.8.2 condit
ion met
Install MultiClusterHub instance in the ACM namespace
cat << EOF | oc apply -f -
apiVersion: operator.open-cluster-management.io/v1
kind: MultiClusterHub
metadata:
  namespace: open-cluster-management
  name: multiclusterhub
spec: {}
EOF
Check that the
MultiClusterHubis installed and running properlyoc wait --for=jsonpath='{.status.phase}'='Running' multiclusterhub multiclusterhub -n open-cluster-management \ --timeout=600s
Configure ODF Multicluster Orchestrator
Install the ODF Multicluster Orchestrator version 4.12
cat << EOF | oc apply -f -
apiVersion: operators.coreos.com/v1alpha1
kind: Subscription
metadata:
  labels:
    operators.coreos.com/odf-multicluster-orchestrator.openshift-operators: ""
  name: odf-multicluster-orchestrator
  namespace: openshift-operators
spec:
  channel: stable-4.12
  installPlanApproval: Automatic
  name: odf-multicluster-orchestrator
  source: redhat-operators
  sourceNamespace: openshift-marketplace
EOF
Check if installation succeeded
oc wait --for=jsonpath='{.status.phase}'='Succeeded' csv -n openshift-operators \
  -l operators.coreos.com/odf-multicluster-orchestrator.openshift-operators=''
If you get the following error, it means that the installation wasn’t completed yet. Wait 3-5 minutes and run the last command again.
error: no matching resources foundA successful output should be similar to:
clusterserviceversion.operators.coreos.com/advanced-cluster-management.v2.8.2 condit
ion met
Import Clusters into ACM
Create a Managed Cluster Set
Make sure you are running sshuttle --dns -NHr "aro@${EAST_JUMP_IP}" $HUB_VIRTUAL_NETWORKin second terminaloc config use hub export MANAGED_CLUSTER_SET_NAME=aro-clusters cat << EOF | oc apply -f - apiVersion: cluster.open-cluster-management.io/v1beta2 kind: ManagedClusterSet metadata: name: $MANAGED_CLUSTER_SET_NAME EOFRetrive token and server from primary cluster
oc config use primary

PRIMARY_API=$(oc whoami --show-server)
PRIMARY_TOKEN=$(oc whoami -t)
Retrieve token and server from secondary cluster
Make sure you are running sshuttle --dns -NHr "aro@${CENTRAL_JUMP_IP}" $SECONDARY_VIRTUAL_NETWORKin second terminaloc config use secondary SECONDARY_API=$(oc whoami --show-server) SECONDARY_TOKEN=$(oc whoami -t)
Import Primary Cluster
Ensure you are in the right context
Make sure you are running sshuttle --dns -NHr "aro@${EAST_JUMP_IP}" $HUB_VIRTUAL_NETWORKin second terminaloc config use hubCreate Managed Cluster
cat << EOF | oc apply -f -
apiVersion: cluster.open-cluster-management.io/v1
kind: ManagedCluster
metadata:
  name: $PRIMARY_CLUSTER
  labels:
    cluster.open-cluster-management.io/clusterset: $MANAGED_CLUSTER_SET_NAME
    cloud: auto-detect
    vendor: auto-detect
spec:
  hubAcceptsClient: true
EOF
Create
auto-import-secret.yamlsecretcat << EOF | oc apply -f - apiVersion: v1 kind: Secret metadata: name: auto-import-secret namespace: $PRIMARY_CLUSTER stringData: autoImportRetry: "2" token: "${PRIMARY_TOKEN}" server: "${PRIMARY_API}" type: Opaque EOFCreate addon config for cluster
cat << EOF | oc apply -f -
apiVersion: agent.open-cluster-management.io/v1
kind: KlusterletAddonConfig
metadata:
  name: $PRIMARY_CLUSTER
  namespace: $PRIMARY_CLUSTER
spec:
  clusterName: $PRIMARY_CLUSTER
  clusterNamespace: $PRIMARY_CLUSTER
  clusterLabels:
    cloud: auto-detect
    vendor: auto-detect
    cluster.open-cluster-management.io/clusterset: $MANAGED_CLUSTER_SET_NAME
  applicationManager:
    enabled: true
  policyController:
    enabled: true
  searchCollector:
    enabled: true
  certPolicyController:
    enabled: true
  iamPolicyController:
    enabled: true
EOF
Check if cluster imported
oc get managedclusters
Import Secondary Cluster
Create Managed Cluster
cat << EOF | oc apply -f -
apiVersion: cluster.open-cluster-management.io/v1
kind: ManagedCluster
metadata:
  name: $SECONDARY_CLUSTER
  labels:
    cluster.open-cluster-management.io/clusterset: $MANAGED_CLUSTER_SET_NAME
    cloud: auto-detect
    vendor: auto-detect
spec:
  hubAcceptsClient: true
EOF
Create
auto-import-secret.yamlsecretcat << EOF | oc apply -f - apiVersion: v1 kind: Secret metadata: name: auto-import-secret namespace: $SECONDARY_CLUSTER stringData: autoImportRetry: "2" token: "${SECONDARY_TOKEN}" server: "${SECONDARY_API}" type: Opaque EOFCreate addon config for cluster
cat << EOF | oc apply -f -
apiVersion: agent.open-cluster-management.io/v1
kind: KlusterletAddonConfig
metadata:
  name: $SECONDARY_CLUSTER
  namespace: $SECONDARY_CLUSTER
spec:
  clusterName: $SECONDARY_CLUSTER
  clusterNamespace: $SECONDARY_CLUSTER
  clusterLabels:
    cloud: auto-detect
    vendor: auto-detect
    cluster.open-cluster-management.io/clusterset: $MANAGED_CLUSTER_SET_NAME
  applicationManager:
    enabled: true
  policyController:
    enabled: true
  searchCollector:
    enabled: true
  certPolicyController:
    enabled: true
  iamPolicyController:
    enabled: true
EOF
Check if cluster imported
oc get managedclusters
Configure Submariner Add-On
Create
Brokerconfigurationcat << EOF | oc apply -f - apiVersion: submariner.io/v1alpha1 kind: Broker metadata: name: submariner-broker namespace: $MANAGED_CLUSTER_SET_NAME-broker labels: cluster.open-cluster-management.io/backup: submariner spec: globalnetEnabled: false EOFDeploy Submariner config to Primary cluster
cat << EOF | oc apply -f -
apiVersion: submarineraddon.open-cluster-management.io/v1alpha1
kind: SubmarinerConfig
metadata:
  name: submariner
  namespace: $PRIMARY_CLUSTER
spec:
  IPSecNATTPort: 4500
  NATTEnable: true
  cableDriver: libreswan
  loadBalancerEnable: true
  gatewayConfig:
    gateways: 1
EOF
Deploy Submariner to Primary cluster
cat << EOF | oc apply -f -
apiVersion: addon.open-cluster-management.io/v1alpha1
kind: ManagedClusterAddOn
metadata:
     name: submariner
     namespace: $PRIMARY_CLUSTER
spec:
     installNamespace: submariner-operator
EOF
Deploy Submariner config to Secondary cluster
cat << EOF | oc apply -f -
apiVersion: submarineraddon.open-cluster-management.io/v1alpha1
kind: SubmarinerConfig
metadata:
  name: submariner
  namespace: $SECONDARY_CLUSTER
spec:
  IPSecNATTPort: 4500
  NATTEnable: true
  cableDriver: libreswan
  loadBalancerEnable: true
  gatewayConfig:
    gateways: 1
EOF
Deploy Submariner to Secondary cluster
cat << EOF | oc apply -f -
apiVersion: addon.open-cluster-management.io/v1alpha1
kind: ManagedClusterAddOn
metadata:
     name: submariner
     namespace: $SECONDARY_CLUSTER
spec:
     installNamespace: submariner-operator
EOF
Check connection status for primary cluster (wait a few minutes)
oc -n $PRIMARY_CLUSTER get managedclusteraddons submariner -o yamlLook for the connection established status. The status indicates the connection is not degraded and healthy.
message: The connection between clusters "primary-cluster" and "secondary-cluster"
  is established
reason: ConnectionsEstablished
status: "False"
type: SubmarinerConnectionDegraded
Check connection status for secondary cluster
oc -n $SECONDARY_CLUSTER get managedclusteraddons submariner -o yamlLook for the connection established status. The status indicates the connection is not degraded and healthy.
message: The connection between clusters "primary-cluster" and "secondary-cluster"
  is established
reason: ConnectionsEstablished
status: "False"
type: SubmarinerConnectionDegraded
Install ODF
Primary Cluster
Switch the context to the primary cluster
oc config use primaryFollow these steps to deploy ODF into the Primary Cluster: https://cloud.redhat.com/experts/aro/odf/
Secondary Cluster
Switch the context to the secondary cluster
oc config use secondaryFollow these steps to deploy ODF into the Secondary Cluster: https://cloud.redhat.com/experts/aro/odf/
Finishing the setup of the disaster recovery solution
Creating Disaster Recovery Policy on Hub cluster
Switch the context to the hub cluster
oc config use hubCreate a DR policy to enable replication between primary and secondary cluster
cat << EOF | oc apply -f -
apiVersion: ramendr.openshift.io/v1alpha1
kind: DRPolicy
metadata:
  name: drpolicy
spec:
  drClusters:
    - primary-cluster
    - secondary-cluster
  schedulingInterval: 5m
EOF
Wait for DR policy to be validated
This can take up to 10 minutes oc get drpolicy drpolicy -o yamlYou should see
status:
  conditions:
  - lastTransitionTime: "2023-10-06T22:54:48Z"
    message: drpolicy validated
    observedGeneration: 2
    reason: Succeeded
    status: "True"
    type: Validated
Two DRClusters are also created
oc get drclustersYou should see
NAME                AGE
primary-cluster     16m
secondary-cluster   16m
Creating the Namespace, the Custom Resource Definition, and the PlacementRule
First, log into the Hub Cluster and create a namespace for the application:
cat <<EOF | oc apply -f -
apiVersion: v1
kind: Namespace
metadata:
 name: busybox-sample
EOF
Now, still logged into the Hub Cluster create a Custom Resource Definition (CRD) for the PlacementRule installed in the busybox-sample namespace. You can do this by applying the CRD YAML file before creating the PlacementRule. Here are the steps:
Install the CRD for PlacementRule
cat <<EOF | oc apply -f -
apiVersion: apiextensions.k8s.io/v1
kind: CustomResourceDefinition
metadata:
  name: placerules.apps.open-cluster-management.io
spec:
  group: apps.open-cluster-management.io
  names:
    kind: PlacementRule
    listKind: PlacementRuleList
    plural: placerules
    singular: placerule
  scope: Namespaced
  versions:
    - name: v1
      served: true
      storage: true
      schema:
        openAPIV3Schema:
          type: object
EOF
Create the PlacementRule
cat <<EOF | oc apply -f -
apiVersion: apps.open-cluster-management.io/v1
kind: PlacementRule
metadata:
  name: busybox-placementrule
  namespace: busybox-sample
spec:
  clusterSelector:
    matchLabels:
      name: primary-cluster
  schedulerName: ramen
EOF
Create application and failover
Create an application with ACM
cat << EOF | oc apply -f -
apiVersion: app.k8s.io/v1beta1
kind: Application
metadata:
  name: busybox-sample
  namespace: busybox-sample
spec:
  componentKinds:
  - group: apps.open-cluster-management.io
    kind: Subscription
  descriptor: {}
  selector:
    matchExpressions:
      - key: app
        operator: In
        values:
          - busybox-sample
---
apiVersion: apps.open-cluster-management.io/v1
kind: Channel
metadata:
  annotations:
    apps.open-cluster-management.io/reconcile-rate: medium
  name: busybox-sample
  namespace: busybox-sample
spec:
  type: Git
  pathname: 'https://github.com/RamenDR/ocm-ramen-samples'
---
apiVersion: apps.open-cluster-management.io/v1
kind: Subscription
metadata:
  annotations:
    apps.open-cluster-management.io/git-branch: main
    apps.open-cluster-management.io/git-path: busybox-odr
    apps.open-cluster-management.io/reconcile-option: merge
  labels:
    app: busybox-sample
  name: busybox-sample-subscription-1
  namespace: busybox-sample
spec:
  channel: busybox-sample/busybox-sample
  placement:
    placementRef:
      kind: PlacementRule
      name: busybox-placementrule
EOF
Associate the DR policy to the application
cat <<EOF | oc apply -f -
apiVersion: ramendr.openshift.io/v1alpha1
kind: DRPlacementControl
metadata:
  labels:
    cluster.open-cluster-management.io/backup: resource
  name: busybox-placementrule-drpc
  namespace: busybox-sample
spec:
  drPolicyRef:
    name: drpolicy
  placementRef:
    kind: PlacementRule
    name: busybox-placementrule
    namespace: busybox-sample
  preferredCluster: $PRIMARY_CLUSTER
  pvcSelector:
    matchLabels:
      appname: busybox-sample
EOF
Failover sample application to secondary cluster
cat <<EOF | oc apply -f -
apiVersion: ramendr.openshift.io/v1alpha1
kind: DRPlacementControl
metadata:
  labels:
    cluster.open-cluster-management.io/backup: resource
  name: busybox-placementrule-drpc
  namespace: busybox-sample
spec:
  action: Failover
  failoverCluster: $SECONDARY_CLUSTER
  drPolicyRef:
    name: drpolicy
  placementRef:
    kind: PlacementRule
    name: busybox-placementrule
    namespace: busybox-sample
  pvcSelector:
    matchLabels:
      appname: busybox-sample
EOF
Verify application runs in secondary cluster
Make sure you are running sshuttle --dns -NHr "aro@${CENTRAL_JUMP_IP}" $SECONDARY_VIRTUAL_NETWORKin second terminaloc config use secondary oc get pods -n busybox-sample
Cleanup
Once you’re done it’s a good idea to delete the cluster to ensure that you don’t get a surprise bill.
Delete the clusters and resources
az aro delete -y  \
  --resource-group rg-eastus  \
  --name hub-cluster

az aro delete -y  \
  --resource-group rg-eastus  \
  --name primary-cluster

az group delete --name rg-eastus

az aro delete -y  \
  --resource-group rg-centralus  \
  --name secondary-cluster

az group delete --name rg-centralus
Additional reference resources:
- Virtual Network Peering
- Regional-DR solution for OpenShift Data Foundation
- Private ARO Cluster with access via JumpHost
- Deploy ACM Submariner for connect overlay networks ARO - ROSA clusters
- Configure ARO with OpenShift Data Foundation
- OpenShift Regional Disaster Recovery with Advanced Cluster Management