Adding a Public Ingress endpoint to a ROSA PrivateLink Cluster
This content is authored by Red Hat experts, but has not yet been tested on every supported configuration.
This is an example guide for creating a public ingress endpoint for a ROSA Private-Link cluster. Be aware of the security implications of creating a public subnet in your ROSA VPC this way.
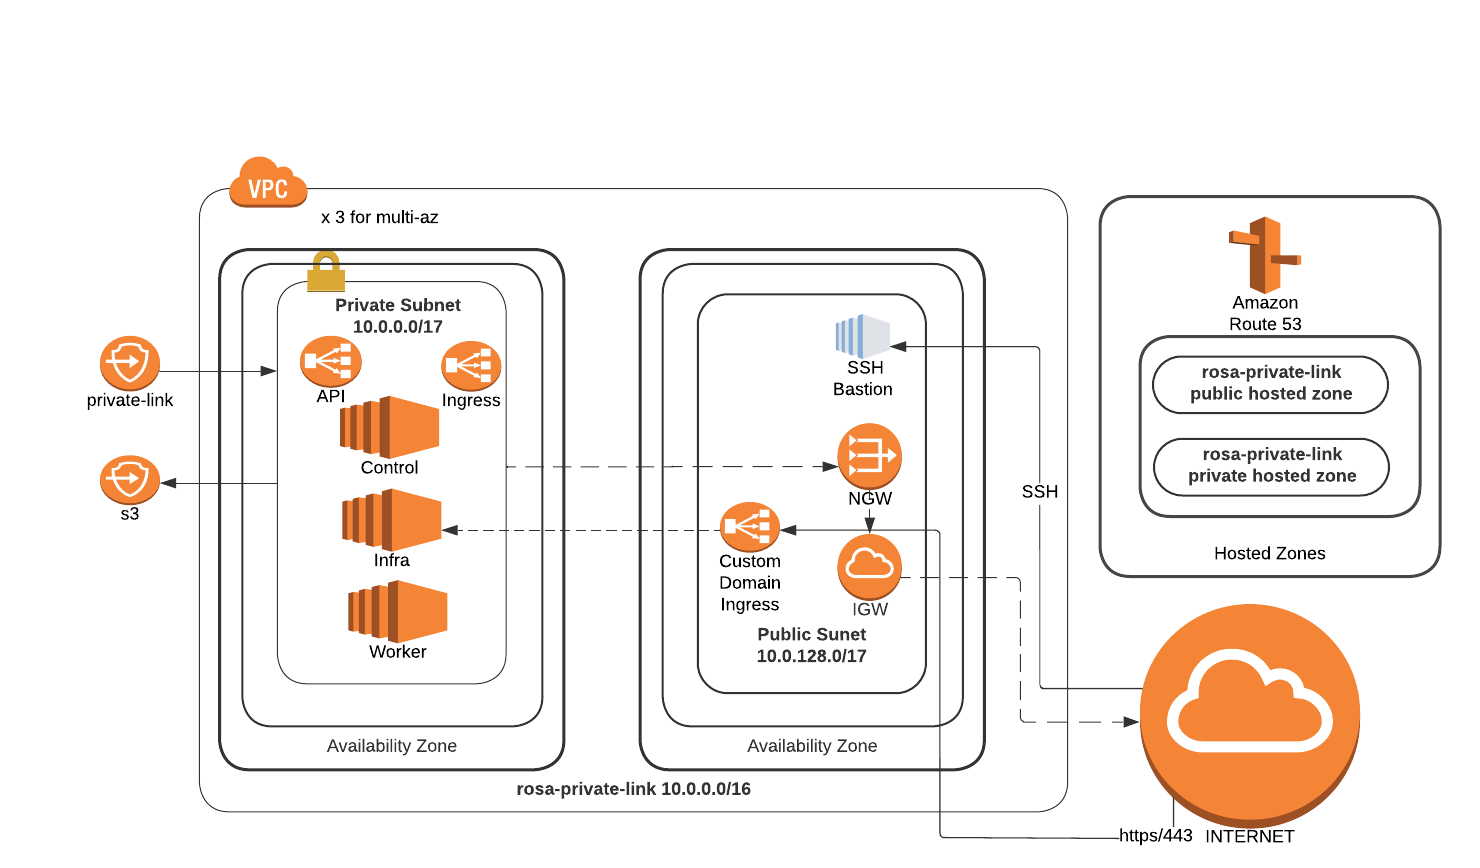
Refer to the blog “How to add public Ingress to a PrivateLink ROSA cluster” , to expose applications to the internet by deploying in a PrivateLink Red Hat OpenShift Service on AWS (ROSA) cluster within a truly private Virtual Private Cloud (VPC) that doesn’t have an internet gateway attached to it. Additionally, the blog details about creating CloudFront distribution for content delivery and WAF to protect web applications by filtering and monitoring HTTP traffic between a web application and the internet. Also,AWS network firewall will be used for fine-grained control over network traffic.
Prerequisites
Getting Started
Set some environment variables
Set the following environment variables, changing them to suit your cluster.
export ROSA_CLUSTER_NAME=private-link
# this should be a free CIDR inside your VPC
export PUBLIC_CIDR=10.0.2.0/24
export AWS_PAGER=""
export EMAIL=username.taken@gmail.com
export DOMAIN=public.aws.mobb.ninja
export SCRATCH_DIR=/tmp/scratch
mkdir -p $SCRATCH_DIR
Create a public subnet
If you followed the above instructions to create the ROSA Private-Link cluster, you should already have a public subnet in your VPC and can skip to tagging the subnet.
Get a Private Subnet ID from the cluster.
PRIVATE_SUBNET_ID=$(rosa describe cluster -c $ROSA_CLUSTER_NAME -o json \
   | jq -r '.aws.subnet_ids[0]')
echo $PRIVATE_SUBNET_ID
Get the VPC ID from the subnet ID.
 VPC_ID=$(aws ec2 describe-subnets --subnet-ids $PRIVATE_SUBNET_ID \
   --query 'Subnets[0].VpcId' --output text)
 echo $VPC_ID
Get the Cluster Tag from the subnet
TAG=$(aws ec2 describe-subnets --subnet-ids $PRIVATE_SUBNET_ID \
   --query 'Subnets[0].Tags[?Value == `shared`]' | jq -r '.[0].Key')
echo $TAG
Create a public subnet
PUBLIC_SUBNET=`aws ec2 create-subnet --vpc-id $VPC_ID --cidr-block $PUBLIC_CIDR \
  --query 'Subnet.SubnetId' --output text`
echo $PUBLIC_SUBNET
Tag the public subnet for the cluster
aws ec2 create-tags --resources $PUBLIC_SUBNET \
   --tags Key=Name,Value=$ROSA_CLUSTER_NAME-public \
   Key=$TAG,Value="shared" Key=kubernetes.io/role/elb,Value="true"
Create a Custom Domain
Create TLS Key Pair for custom domain using certbot:
Skip this if you already have a key pair.
certbot certonly --manual \
  --preferred-challenges=dns \
  --email $EMAIL \
  --server https://acme-v02.api.letsencrypt.org/directory \
  --agree-tos \
  --config-dir "$SCRATCH_DIR/config" \
  --work-dir "$SCRATCH_DIR/work" \
  --logs-dir "$SCRATCH_DIR/logs" \
  -d "*.$DOMAIN"
Create TLS secret for custom domain:
Note use your own keypair paths if not using certbot.
CERTS=/tmp/scratch/config/live/$DOMAIN
oc new-project my-custom-route
oc create secret tls acme-tls --cert=$CERTS/fullchain.pem --key=$CERTS/privkey.pem
Create Custom Domain resource:
cat << EOF | oc apply -f -
apiVersion: managed.openshift.io/v1alpha1
kind: CustomDomain
metadata:
  name: acme
spec:
  domain: $DOMAIN
  certificate:
    name: acme-tls
    namespace: my-custom-route
EOF
Wait for the domain to be ready:
watch oc get customdomainsOnce its ready grab the CLB name:
CDO_NAME=acme
CLB_NAME=$(oc get svc -n openshift-ingress -o jsonpath='{range .items[?(@.metadata.labels.ingresscontroller\.operator\.openshift\.io\/owning-ingresscontroller=="'$CDO_NAME'")]}{.status.loadBalancer.ingress[].hostname}{"\n"}{end}')
echo $CLB_NAME
Create a CNAME in your DNS provider for *.<$DOMAIN> that points at the CLB NAME from the above command.
Deploy a public application
Create a new project
oc new-project my-public-appCreate a new application
oc new-app --docker-image=docker.io/openshift/hello-openshiftCreate a route for the application
oc create route edge --service=hello-openshift hello-openshift-tls \
  --hostname hello.$DOMAIN
Check that you can access the application:
curl https://hello.$DOMAINYou should see the output
Hello OpenShift!