ARO Custom domain with cert-manager and LetsEncrypt
This content is authored by Red Hat experts, but has not yet been tested on every supported configuration.
ARO guide to deploying an ARO cluster with custom domain and automating certificate management with cert-manager and letsencrypt certificates to manage the *.apps and api endpoints.
Prerequisites
- az cli (already installed in Azure Cloud Shell)
- oc cli
- jq (already installed in Azure Cloud Shell)
- OpenShift 4.10+
- domain name to use (we will create zones for this domain name during this guide)
I’m going to be running this setup through Bash on the Azure Cloud Shell. Be sure to always use the same terminal/session for all commands since we’ll reference environment variables set or created through the steps.
Azure Cloud Shell - Bash
See Azure Docs for alternative install options.
Install oc CLI
Follow the instructions in Installing the OpenShift CLI on Linux to install
ocCLI.
Prepare Azure Account for Azure OpenShift
Register resource providers
az provider register -n Microsoft.RedHatOpenShift --wait
az provider register -n Microsoft.Compute --wait
az provider register -n Microsoft.Storage --wait
az provider register -n Microsoft.Authorization --wait
Get Red Hat pull secret
Log into cloud.redhat.com
Browse to https://cloud.redhat.com/openshift/install/azure/aro-provisioned
click Copy pull secret
Back in the Azure Cloud Shell, enter the following. Instead of
<paste_your_secret>, paste your actual secret on that line. To do so, right-click and choose paste.cat >> ./pull-secret.txt << EOF <paste_your_secret> EOF
Deploy Azure OpenShift
Variables and Resource Group
Set some environment variables to use later, and create an Azure Resource Group.
Set the following environment variables
Change the values to suit your environment
PULL_SECRET=./pull-secret.txt  # the path to pull-secret
LOCATION=southcentralus        # the location of your cluster
RESOURCEGROUP=aro-rg           # the name of the resource group where you want to create your cluster
CLUSTER=aro-cluster            # the name of your cluster
DOMAIN=lab.domain.com          # Domain or subdomain zone for cluster & cluster api
Create an Azure resource group
az group create \
--name $RESOURCEGROUP \
--location $LOCATION
Networking
Create a virtual network with two empty subnets
Create virtual network
az network vnet create \
   --resource-group $RESOURCEGROUP \
   --name aro-vnet \
   --address-prefixes 10.0.0.0/22
Create control plane subnet
az network vnet subnet create \
--resource-group $RESOURCEGROUP \
--vnet-name aro-vnet \
--name master-subnet \
--address-prefixes 10.0.0.0/23 \
--service-endpoints Microsoft.ContainerRegistry
Create machine subnet
az network vnet subnet create \
--resource-group $RESOURCEGROUP \
--vnet-name aro-vnet \
--name worker-subnet \
--address-prefixes 10.0.2.0/23 \
--service-endpoints Microsoft.ContainerRegistry
Disable network policies on the control plane subnet
This is required for the service to be able to connect to and manage the cluster.
az network vnet subnet update \
--name master-subnet \
--resource-group $RESOURCEGROUP \
--vnet-name aro-vnet \
--disable-private-link-service-network-policies true
Create the cluster
This will take between 30 and 45 minutes.
az aro create \
--resource-group $RESOURCEGROUP \
--name $CLUSTER \
--vnet aro-vnet \
--master-subnet master-subnet \
--worker-subnet worker-subnet \
--pull-secret @$PULL_SECRET \
--domain $DOMAIN
Wait until the ARO cluster is fully provisioned.
Create DNS Zones & Service Principal
In order for cert-manager to work with AzureDNS, we need to create the zone and add a CAA record as well as create a Service Principal that we can use to manage records in this zone so CertManager can use DNS01 authentication for validating requests.
This zone should be a public zone since letsencrypt will need to be able to read records created here.
If you use a subdomain, please be sure to create the NS records in your primary domain to the subdomain.
For ease of management, we’re using the same resource group for domain as we have the cluster in.
Create Zone
az network dns zone create -g $RESOURCEGROUP -n $DOMAINYou will need to configure your nameservers to point to Azure. The output of running this zone create will show you the nameservers for this record that you will need to set up within your domain registrar.
Create API DNS record
APIREC=$(az aro show -g $RESOURCEGROUP -n $CLUSTER --query apiserverProfile.ip -o tsv)
az network dns record-set a add-record -g $RESOURCEGROUP -z $DOMAIN \
-n api -a $APIREC
Create Wildcard DNS record
WILDCARDREC=$(az aro show -n $CLUSTER -g $RESOURCEGROUP --query '{ingress:ingressProfiles[0].ip}' -o tsv)
az network dns record-set a add-record -g $RESOURCEGROUP -z $DOMAIN \
-n "*.apps" -a $WILDCARDREC
Add CAA Record
CAA is a type of DNS record that allows owners to specify which Certificate Authorities are allowed to issue certificates containing their domain names.
az network dns record-set caa add-record -g $RESOURCEGROUP -z $DOMAIN \
-n @ --flags 0 --tag "issuewild" --value "letsencrypt.org"
You should be able to view the records in your console
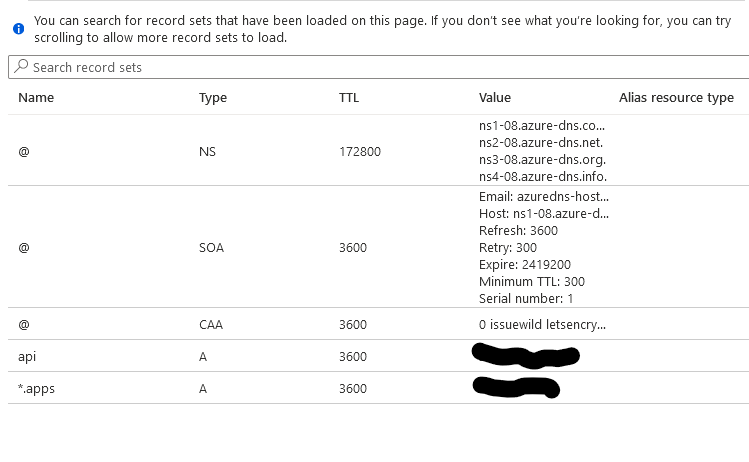
Note - You may have to create NS records in your root zone for a subdomain if you use a subdomain zone to point to the subdomains name servers.
Set environment variables to build new service principal and credentials to allow cert-manager to create records in this zone.
AZURE_CERT_MANAGER_NEW_SP_NAME = the name of the service principal to create that will manage the DNS zone automation for cert-manager.
AZURE_CERT_MANAGER_NEW_SP_NAME=aro-dns-sp
LETSENCRYPTEMAIL=youremail@work.com
DNS_SP=$(az ad sp create-for-rbac --name $AZURE_CERT_MANAGER_NEW_SP_NAME --output json)
AZURE_CERT_MANAGER_SP_APP_ID=$(echo $DNS_SP | jq -r '.appId')
AZURE_CERT_MANAGER_SP_PASSWORD=$(echo $DNS_SP | jq -r '.password')
AZURE_TENANT_ID=$(echo $DNS_SP | jq -r '.tenant')
AZURE_SUBSCRIPTION_ID=$(az account show --output json | jq -r '.id')
Restrict service principal - remove contributor role if it exists.
Note: If you get the error message
No matched assignments were found to delete, that’s fine, and it is safe to proceed. We’re going to grant the DNS Management Role to it next.az role assignment delete --assignee $AZURE_CERT_MANAGER_SP_APP_ID --role ContributorGrant DNS Zone Contributor to our Service Principal
We’ll grant DNS Zone Contributor to our DNS Service principal.
az role assignment create --assignee $AZURE_CERT_MANAGER_SP_APP_ID --role befefa01-2a29-4197-83a8-272ff33ce314 --scope /subscriptions/$AZURE_SUBSCRIPTION_IDAssign service principal to DNS zone
DNS_ID=$(az network dns zone show --name $DOMAIN --resource-group $RESOURCEGROUP --query "id" --output tsv)
az role assignment create --assignee $AZURE_CERT_MANAGER_SP_APP_ID --role "DNS Zone Contributor" --scope $DNS_ID
Get OpenShift console URL
az aro show -g $RESOURCEGROUP -n $CLUSTER --query "consoleProfile.url" -o tsvGet OpenShift API URL
az aro show -g $RESOURCEGROUP -n $CLUSTER --query "apiserverProfile.url" -o tsvGet OpenShift credentials
You can use these to log in to the web console (will get a cert warning that you can bypass with typing “thisisunsafe” in a chrome browser or login with oc)
az aro list-credentials --name $CLUSTER --resource-group $RESOURCEGROUP
Log In to Cluster
Log in to your cluster through oc cli
You may need to flush your local dns resolver/cache before you can see the DNS/Hostnames. On Windows you can open up a command prompt as administrator and type “ipconfig /flushdns”
apiServer=$(az aro show -g $RESOURCEGROUP -n $CLUSTER --query apiserverProfile.url -o tsv)
loginCred=$(az aro list-credentials --name $CLUSTER --resource-group $RESOURCEGROUP --query "kubeadminPassword" -o tsv)
oc login $apiServer -u kubeadmin -p $loginCred
You may get a warning that the certificate isn’t trusted. We can ignore that now since we’re in the process of adding a trusted certificate.
Set up Cert-Manager
We’ll install cert-manager from operatorhub. If you experience any issues installing here, it probably means that you didn’t provide a pull-secret when you installed your ARO cluster.
Create namespace
cat <<EOF | oc apply -f -
apiVersion: v1
kind: Namespace
metadata:
  annotations:
    openshift.io/display-name:  Red Hat Certificate Manager Operator
  labels:
    openshift.io/cluster-monitoring: 'true'
  name: openshift-cert-manager-operator
EOF
Switch openshift-cert-manager-operator project (namespace)
oc project openshift-cert-manager-operatorCreate OperatorGroup
cat <<EOF | oc apply -f -
apiVersion: operators.coreos.com/v1
kind: OperatorGroup
metadata:
  name: openshift-cert-manager-operator
spec: {}
EOF
Create subscription for cert-manager operator
cat <<EOF | oc apply -f -
apiVersion: operators.coreos.com/v1alpha1
kind: Subscription
metadata:
  name: openshift-cert-manager-operator
  namespace: openshift-cert-manager-operator
spec:
  channel: tech-preview
  installPlanApproval: Automatic
  name: openshift-cert-manager-operator
  source: redhat-operators
  sourceNamespace: openshift-marketplace
EOF
It will take a few minutes for this operator to install and complete it’s set up. May be a good time to take a coffee break :)
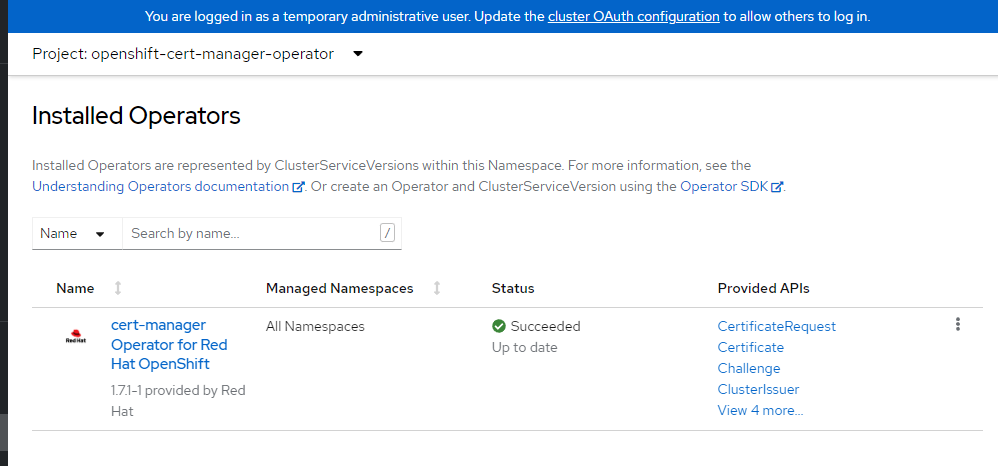
Wait for cert-manager operator to finish installing.
Our next steps can’t complete until the operator has finished installing. I recommend that you log in to your cluster console with the URL and credentials you captured after you ran the az aro create and view the installed operators to see that everything is complete and successful.
Configure cert-manager LetsEncrypt
We’re going to set up cert-manager to use DNS verification for letsencrypt certificates. We’ll need to generate a service principal that can update the DNS zone and create short term records needed to validate certificate requests and associate this service principal with the cluster issuer.
Configure Certificate Requestor
Switch openshift-cert-manager project (namespace)
oc project openshift-cert-managerCreate azuredns-config secret for storing service principal credentials to manage zone.
oc create secret generic azuredns-config --from-literal=client-secret=$AZURE_CERT_MANAGER_SP_PASSWORD -n openshift-cert-managerCreate Cluster Issuer
cat <<EOF | oc apply -f -
apiVersion: cert-manager.io/v1
kind: ClusterIssuer
metadata:
  name: letsencrypt-prod
spec:
  acme:
    server: https://acme-v02.api.letsencrypt.org/directory
    email: $LETSENCRYPTEMAIL
    # This key doesn't exist, cert-manager creates it
    privateKeySecretRef:
      name: prod-letsencrypt-issuer-account-key
    solvers:
    - dns01:
        azureDNS:
          clientID: $AZURE_CERT_MANAGER_SP_APP_ID
          clientSecretSecretRef:
            name: azuredns-config
            key: client-secret
          subscriptionID: $AZURE_SUBSCRIPTION_ID
          tenantID: $AZURE_TENANT_ID
          resourceGroupName: $RESOURCEGROUP
          hostedZoneName: $DOMAIN
          environment: AzurePublicCloud
EOF
Describe issuer
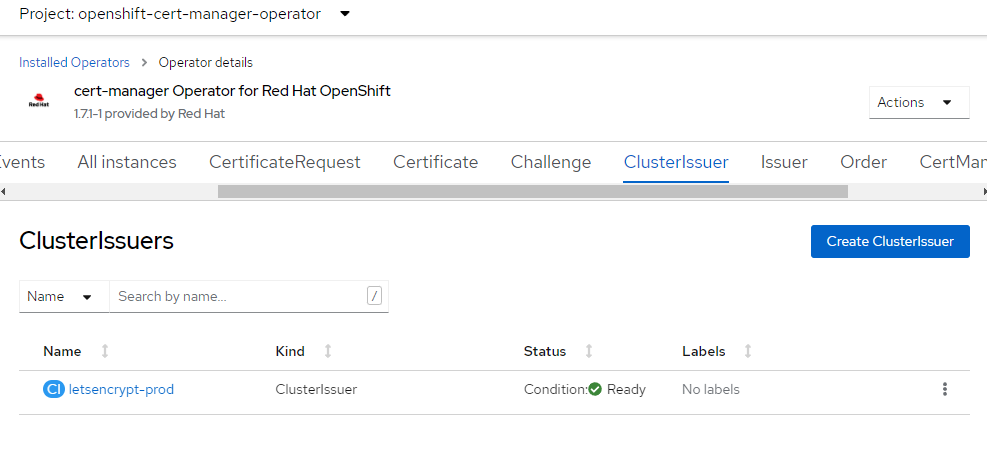
oc describe clusterissuer letsencrypt-prodYou should see some output that the issuer is Registered/Ready
Conditions:
 Last Transition Time:  2022-06-17T17:29:37Z
 Message:               The ACME account was registered with the ACME server
 Observed Generation:   1
 Reason:                ACMEAccountRegistered
 Status:                True
 Type:                  Ready
Events:                    <none>
Once the above command is complete, you should be able to log in to the OpenShift console, navigate to Installed Operators, click on the cert-manager Operator, make sure you’re in the “openshift-cert-manager-operator” project, and click the ClusterIssuer tab. You should see a screen like this. Again, if you have an ssl error and use a chrome browser - type “thisisunsafe” to get in if you get an error its an invalid cert.
Create & Install API Certificate
Switch openshift-config project /
oc project openshift-configConfigure API certificate
cat <<EOF | oc apply -f -
apiVersion: cert-manager.io/v1
kind: Certificate
metadata:
  name: openshift-api
  namespace: openshift-config
spec:
  secretName: openshift-api-certificate
  issuerRef:
    name: letsencrypt-prod
    kind: ClusterIssuer
  dnsNames:
  - api.$DOMAIN
EOF
View certificate status
oc describe certificate openshift-api -n openshift-configCreate cluster api cert job
This job will install the certificate
cat <<EOF | oc apply -f -
apiVersion: rbac.authorization.k8s.io/v1
kind: ClusterRole
metadata:
  name: patch-cluster-api-cert
rules:
  - apiGroups:
      - ""
    resources:
      - secrets
    verbs:
      - get
      - list
  - apiGroups:
      - config.openshift.io
    resources:
      - apiservers
    verbs:
      - get
      - list
      - patch
      - update
---
apiVersion: rbac.authorization.k8s.io/v1
kind: ClusterRoleBinding
metadata:
  name: patch-cluster-api-cert
roleRef:
  apiGroup: rbac.authorization.k8s.io
  kind: ClusterRole
  name: patch-cluster-api-cert
subjects:
  - kind: ServiceAccount
    name: patch-cluster-api-cert
    namespace: openshift-config
---
apiVersion: v1
kind: ServiceAccount
metadata:
  name: patch-cluster-api-cert
---
apiVersion: batch/v1
kind: Job
metadata:
  name: patch-cluster-api-cert
  annotations:
    argocd.argoproj.io/hook: PostSync
    argocd.argoproj.io/hook-delete-policy: HookSucceeded
spec:
  template:
    spec:
      containers:
        - image: image-registry.openshift-image-registry.svc:5000/openshift/cli:latest
          env:
            - name: API_HOST_NAME
              value: api.$DOMAIN
          command:
            - /bin/bash
            - -c
            - |
              #!/usr/bin/env bash
              if oc get secret openshift-api-certificate -n openshift-config; then
                oc patch apiserver cluster --type=merge -p '{"spec":{"servingCerts": {"namedCertificates": [{"names": ["'\$API_HOST_NAME'"], "servingCertificate": {"name": "openshift-api-certificate"}}]}}}'
              else
                echo "Could not execute sync as secret 'openshift-api-certificate' in namespace 'openshift-config' does not exist, check status of CertificationRequest"
                exit 1
              fi
          name: patch-cluster-api-cert
      dnsPolicy: ClusterFirst
      restartPolicy: Never
      terminationGracePeriodSeconds: 30
      serviceAccount: patch-cluster-api-cert
      serviceAccountName: patch-cluster-api-cert
EOF
Create & Install APPS Wildcard Certificate
Switch openshift-ingress project (namespace)
oc project openshift-ingressConfigure Wildcard Certificate
cat <<EOF | oc apply -f -
apiVersion: cert-manager.io/v1
kind: Certificate
metadata:
  name: openshift-wildcard
  namespace: openshift-ingress
spec:
  secretName: openshift-wildcard-certificate
  issuerRef:
     name: letsencrypt-prod
     kind: ClusterIssuer
  commonName: "*.apps.$DOMAIN"
  dnsNames:
  - "*.apps.$DOMAIN"
EOF
This will generate our API and wildcard certificate requests. We’ll now create two jobs that will install these certificates.
View certificate status
oc describe certificate openshift-wildcard -n openshift-ingressInstall Wildcard Certificate Job
cat <<EOF | oc apply -f -
apiVersion: rbac.authorization.k8s.io/v1
kind: ClusterRole
metadata:
  name: patch-cluster-wildcard-cert
rules:
  - apiGroups:
      - operator.openshift.io
    resources:
      - ingresscontrollers
    verbs:
      - get
      - list
      - patch
  - apiGroups:
      - ""
    resources:
      - secrets
    verbs:
      - get
      - list
---
apiVersion: rbac.authorization.k8s.io/v1
kind: ClusterRoleBinding
metadata:
  name: patch-cluster-wildcard-cert
roleRef:
  apiGroup: rbac.authorization.k8s.io
  kind: ClusterRole
  name: patch-cluster-wildcard-cert
subjects:
  - kind: ServiceAccount
    name: patch-cluster-wildcard-cert
    namespace: openshift-ingress
---
apiVersion: v1
kind: ServiceAccount
metadata:
  name: patch-cluster-wildcard-cert
---
apiVersion: batch/v1
kind: Job
metadata:
  name: patch-cluster-wildcard-cert
  annotations:
    argocd.argoproj.io/hook: PostSync
    argocd.argoproj.io/hook-delete-policy: HookSucceeded
spec:
  template:
    spec:
      containers:
        - image: image-registry.openshift-image-registry.svc:5000/openshift/cli:latest
          command:
            - /bin/bash
            - -c
            - |
              #!/usr/bin/env bash
              if oc get secret openshift-wildcard-certificate -n openshift-ingress; then
                oc patch ingresscontroller default -n openshift-ingress-operator --type=merge --patch='{"spec": { "defaultCertificate": { "name": "openshift-wildcard-certificate" }}}'
              else
                echo "Could not execute sync as secret 'openshift-wildcard-certificate' in namespace 'openshift-ingress' does not exist, check status of CertificationRequest"
                exit 1
              fi
          name: patch-cluster-wildcard-cert
      dnsPolicy: ClusterFirst
      restartPolicy: Never
      terminationGracePeriodSeconds: 30
      serviceAccount: patch-cluster-wildcard-cert
      serviceAccountName: patch-cluster-wildcard-cert
EOF
Debugging
One of the most helpful commands i’ve seen for debugging is in regards to challenges failing. The order says pending in perpetuity and you can run this to see why.
oc describe challenges
This is a very helpful guide in debugging certificates as well.
Validate Certificates
It will take a few minutes for the jobs to successfully complete.
Once the certificate requests are complete, you should no longer see a browser security warning and you should have a valid SSL lock in your browser and no more warnings about SSL on cli.
You may want to open an InPrivate/Private browser tab to visit the console/api via the URLs you previously listed so you can see the new SSL cert without having to expire your cache.
Delete Cluster
Once you’re done its a good idea to delete the cluster to ensure that you don’t get a surprise bill.
Delete the cluster
az aro delete -y \
  --resource-group $RESOURCEGROUP \
  --name $CLUSTER
Delete the Azure resource group
Only do this if there’s nothing else in the resource group.
az group delete -y \
  --name $RESOURCEGROUP